Make a Video Call with Web SDK
Web SDK Integration Architecture
The Web SDK is a fast and effective way to include a live video chat in a web application. It consists of a JavaScript library that adds a floating widget to your web page, allowing chats and video calls out of the box. In addition, you can customize the user experience, or even leverage your own chat widget in place of the one supplied, by using the functions and parameters provided by the library. The SDK can be included as an NPM module or it can be embedded directly in a web page.
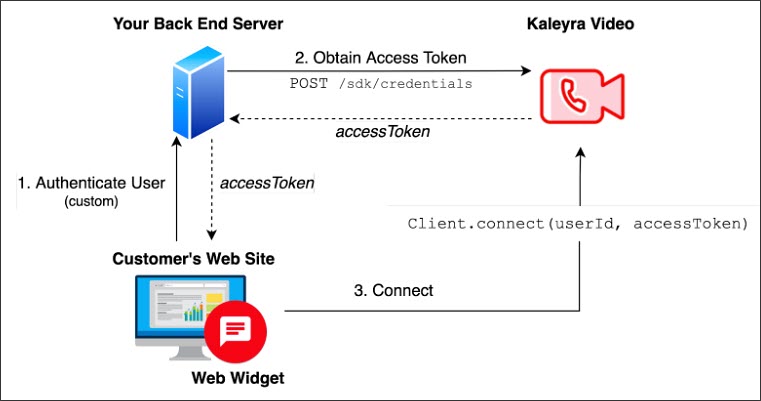
The following diagram represents the most common integration layout of the Web SDK and the section following the diagram elaborates on the flow:
Note:The access token used by the SDK is obtained on the server side. This implementation ensures that the apiKey is not shared publicly, and the access token is bound to the user session on the integrated website.
Using the apiKey on the client side is strongly discouraged and should be absolutely avoided in production.
1. Authenticate User
The user accesses the integrated website by leveraging an authentication method of choice. User authentication is done externally from Kaleyra Video.
2. Obtain Access Token
A back-end service calls the API, POST /sdk/credentials, passing the following payload, using the appropriate userId:
{
   user_id: "user id",
   expires_in: 3600
}
The expires_in parameter represents the access token’s expiration time expressed in seconds. It must be chosen within a range between 360 (6 minutes) and 86400 (24 hours).
The access token can be found in the response:
{
    "access_token":
"eyJhbGciOiJIUzI1NiIsInR5cCI6IkpXVCJ9.eyJ1c2VyIjoidGVzdCIsImNvbXBhbnlJZCI6IjEzM2Q0MmNlLWVkZGItMTFlNi05OTUzLTAyMTI0YWI0M2Q2NyIsImFsbG93Q2FtZXJhIjp0cnVlLCJpYXQiOjE2NTEwNTQ4MjEsImV4cCI6MTY1MTA1ODQyMSwiaXNzIjoiQHN3aXRjaGJvYXJkLWNvcmUiLCJzdWIiOiJ0ZXN0IzEzM2Q0MmNlLWVkZGItMTFlNi05OTUzLTAyMTI0YWI0M2Q2NyJ9.une0gwwke1ZwShfXbSPk3KDtbEQ39-aMXWmgsq8M8M0",
    "expires_at": "2022-01-10T11:41:19.000Z",
    "user_id": "user_xxx"
}
This operation is usually done in the context of user authentication so that the access token is returned to the client along with the user information. Alternatively, it can be retrieved at a later time, before displaying the widget. This is an implementation choice. A refresh policy for the token may be needed to ensure a smooth experience for the user.
3. Connect
The Web SDK can connect the user to Kaleyra Video by using the connect function Client.connect(userId, accessToken).
You can make a basic integration of the widget for testing purposes by simply copy-pasting the following snippet of code inside the <body> tag of an HTML file.
Substitute <version> with the desired version of the SDK.
Note:You can find the latest version here: https://github.com/Bandyer/Bandyer-Chat-Widget#versions
Alternatively, you can run npm view @bandyer/bandyer-chat-widget version
on your terminal.
Set userId, appId, region, environment, and accessToken variables as indicated in the following code:
Note:In sandbox environment ‘region’ is always ‘eu’.
<script src="https://cdn.bandyer.com/sdk/js/chat/<version>/bandyer-widget.min.js" type="text/javascript" ></script>
<script type="text/javascript">
    const userId = 'user id';
    const appId = 'app id associated to your account';
    const region = 'region to which your account belongs: eu or in';
    const environment = 'sandbox or production';
    const accessToken = 'returned by POST /sdk/credentials on server side'
    window.createWidget = async function() {
        window.Client = window.BandyerSDK.configure({
          appId: appId,
	      region: region,
	      environment: environment,
            tools: {
	          chat: true
	      }
        })
        await Client.connect(userId, accessToken)
    };

    window.createWidget();
</script>
Note:There are a lot of customizations available. Refer to Chat-Widget for more information.
Updated 11 months ago