Launch a WhatsApp Campaign
Enter campaign details, select contacts, and review the estimated cost before the launch.
When you want to launch a WhatsApp campaign, you must provide the campaign details, select a WhatsApp template, select a contacts’ list, and review the estimated cost for the launch.
Dynamic Variables Support in WhatsApp Campaign
The WhatsApp campaign feature supports passing dynamic variables to the WhatsApp template that otherwise cannot be edited. When you prepare to launch a WhatsApp campaign using a WhatsApp template, you can pass dynamic variables to the template using a file that contains columns for the variables.
The template can contain placeholders like {{1}}, {{2}}, {{3}} for the dynamic variables and a file that contains columns with variable values in the same order. This way, you can make the template editable with customized values.
Note:Make sure to select a WhatsApp template that contains at least one dynamic variable and have a column in the customers’ contact file.
Dynamic Media URL Support in WhatsApp Campaign
The WhatsApp campaign supports sending bulk messages with customized media files for each recipient, i.e. it is possible to send different media files to different customers dynamically. This can be done by selecting a media template and by uploading a customer contact file where for each contact, a Media File URL, represented by a dynamic variable is present.
The media files can be of type ‘video’, ‘image’, or a ‘document’ and the supported file size as per Meta is , 5MB for Image, 16 MB for videos and 100 MB for documents.
To send the customized media files to your customers dynamically, you must upload a contacts’ list to be used for the campaign in a file format and add the appropriate media file URLs in the file itself against each contact number under the column ‘media_url’.
Note:Make sure to name the column name as ‘media_url’ only in the file.
When this file is uploaded as part of a campaign flow in the ‘Set Audience’ step, the respective media files are sent to your customers along with the WhatsApp message. When there is no media file present for a contact in the file, the default media file URL that you have selected in the ‘Compose’ section on the WhatsApp Campaign Launch page is sent.
WhatsApp Campaign Pre-requisitesto launch a WhatsApp Campaign:
- At least one active WABA (WhatsApp Business Account) is associated with your account.
- At least one phone number is associated with the WABA.
- At least one approved message template.
The following section describes the steps to launch a WhatsApp campaign.
Note:Make sure to select the correct WABA ID from the WABA menu on the top of the Campaigns list page that has the specific template you intend to use for the campaign.
If you decide to select a different WABA ID after filling in the details for a few of the campaign fields, the entered field values are lost, and you will have to fill up the field details again.
Launching a WhatsApp Campaign
The following section describes the steps to launch a WhatsApp campaign.
- Sign in to your Kaleyra.io account (https://kaleyra.io/).
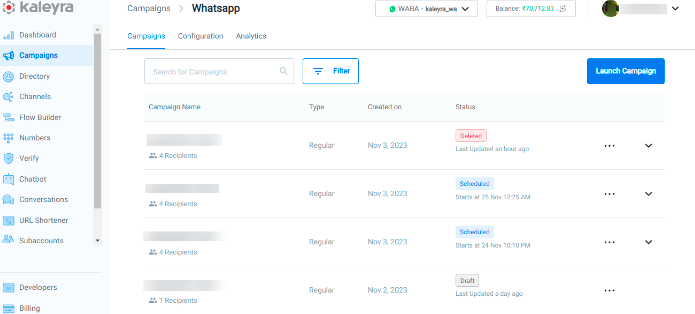
- Go to Campaigns and then click WhatsApp.
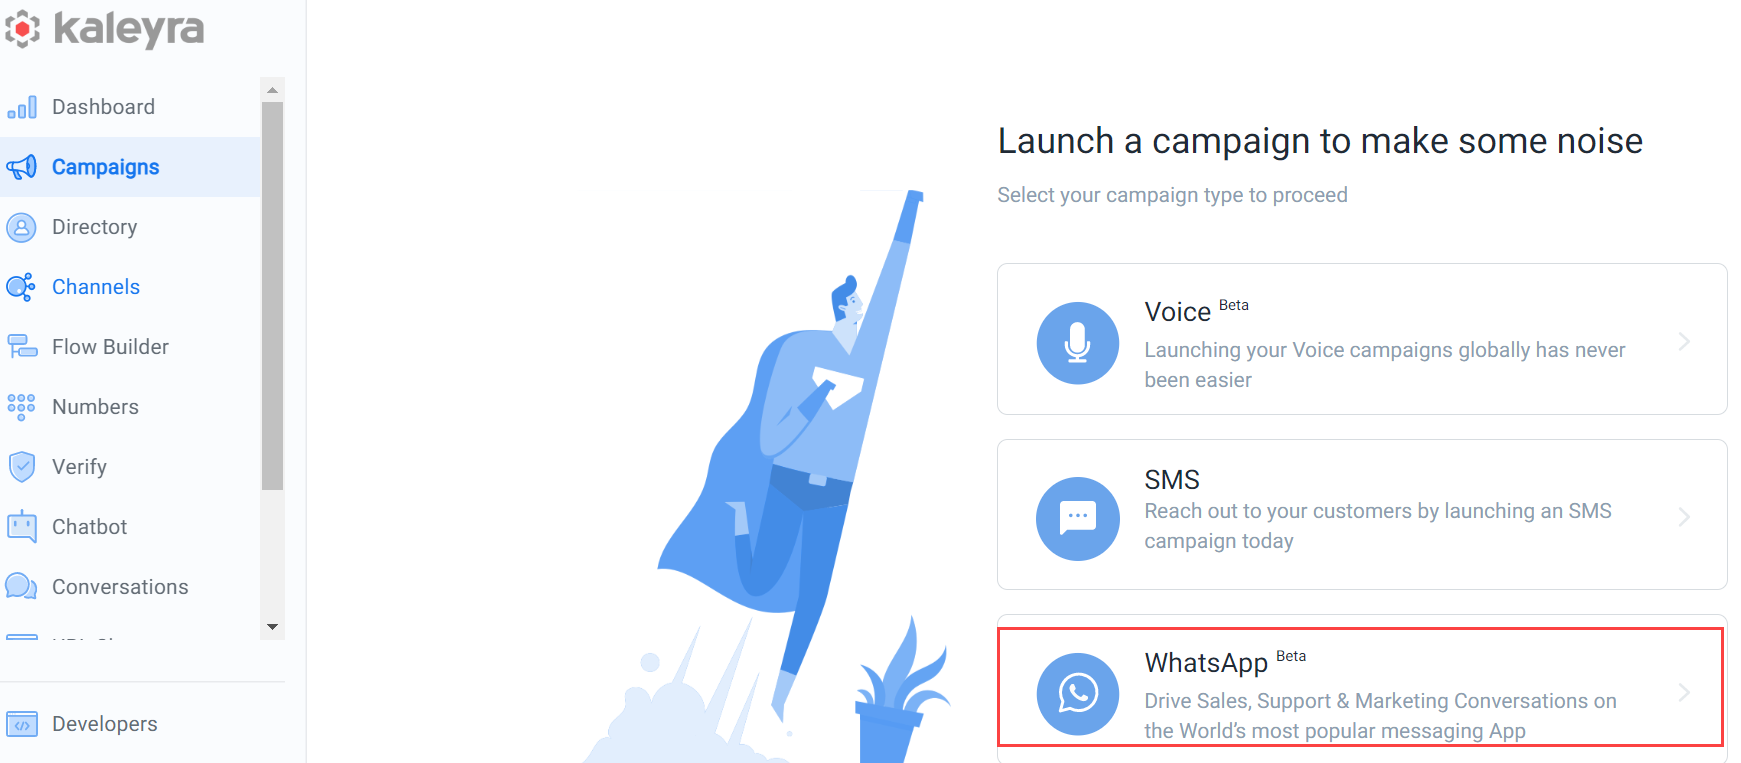
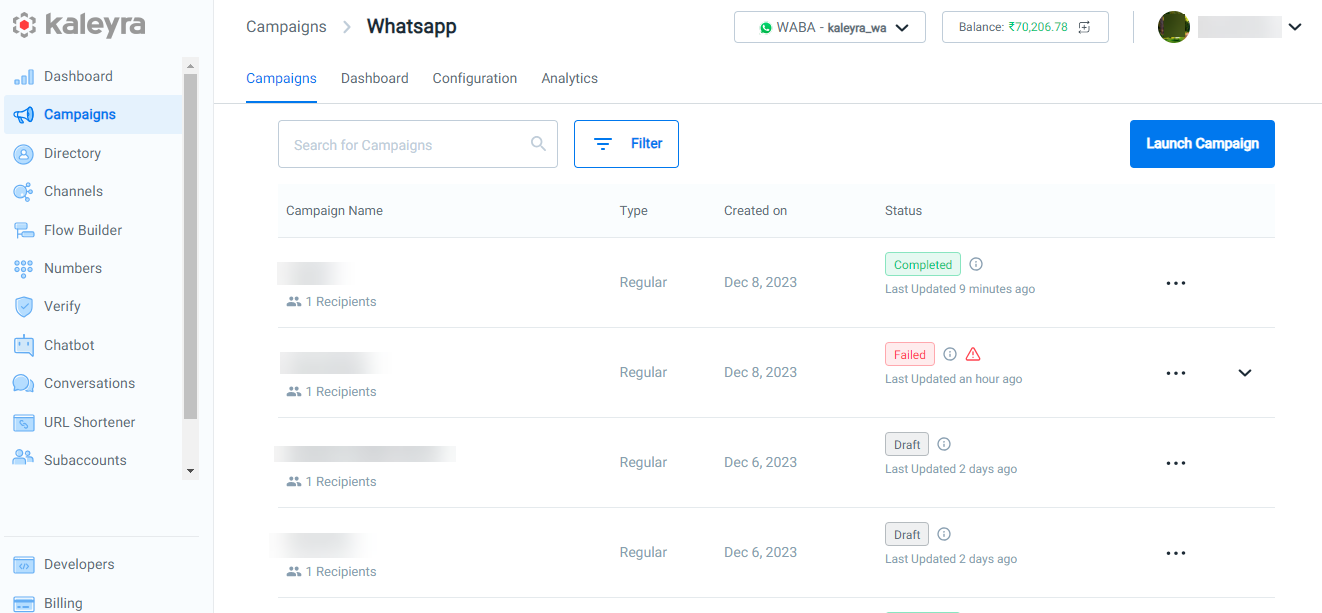
The WhatsApp Campaigns list appears. The list shows the campaign names, the type of campaign, the date of campaign creation, and the campaign status for all the past campaigns.
To know more about the Campaign list, see the WhatsApp Campaigns list section below.
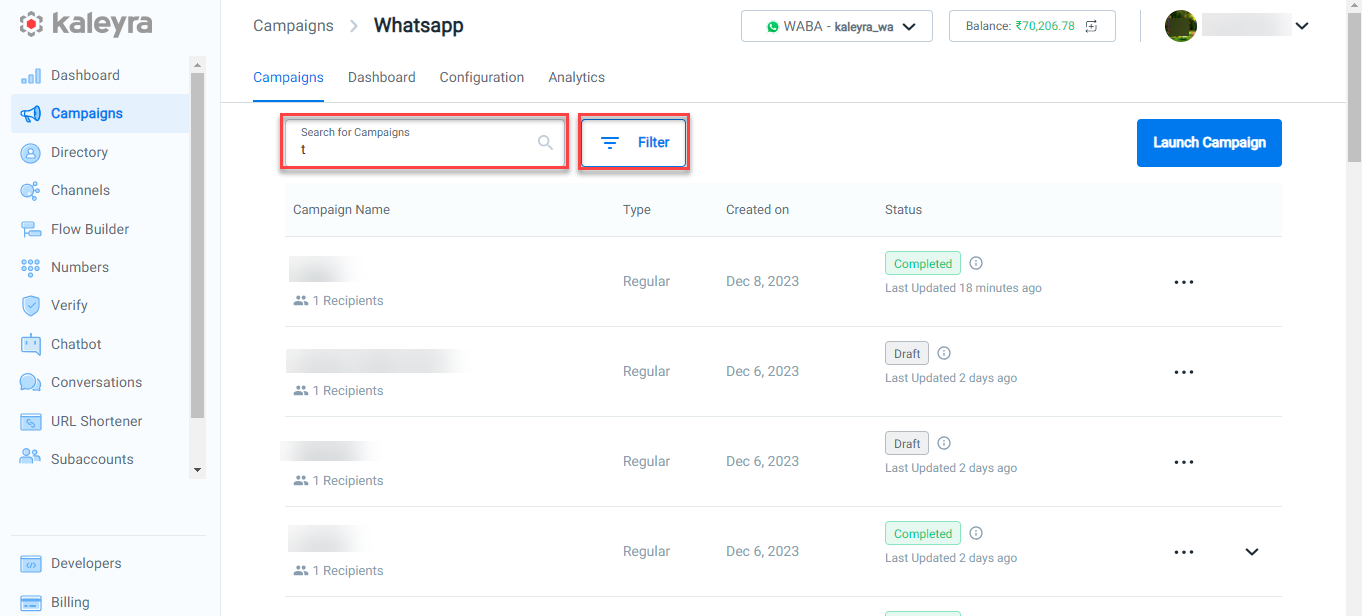
- In the Search for Campaigns field, enter the complete or partial campaign name for which you wish to search, and the respective campaigns list appears.
- or received by Meta is at least 90 percent of the total campaign size.
- On the WhatsApp Campaigns list, click Launch Campaign.
The Set up your campaign page appears.
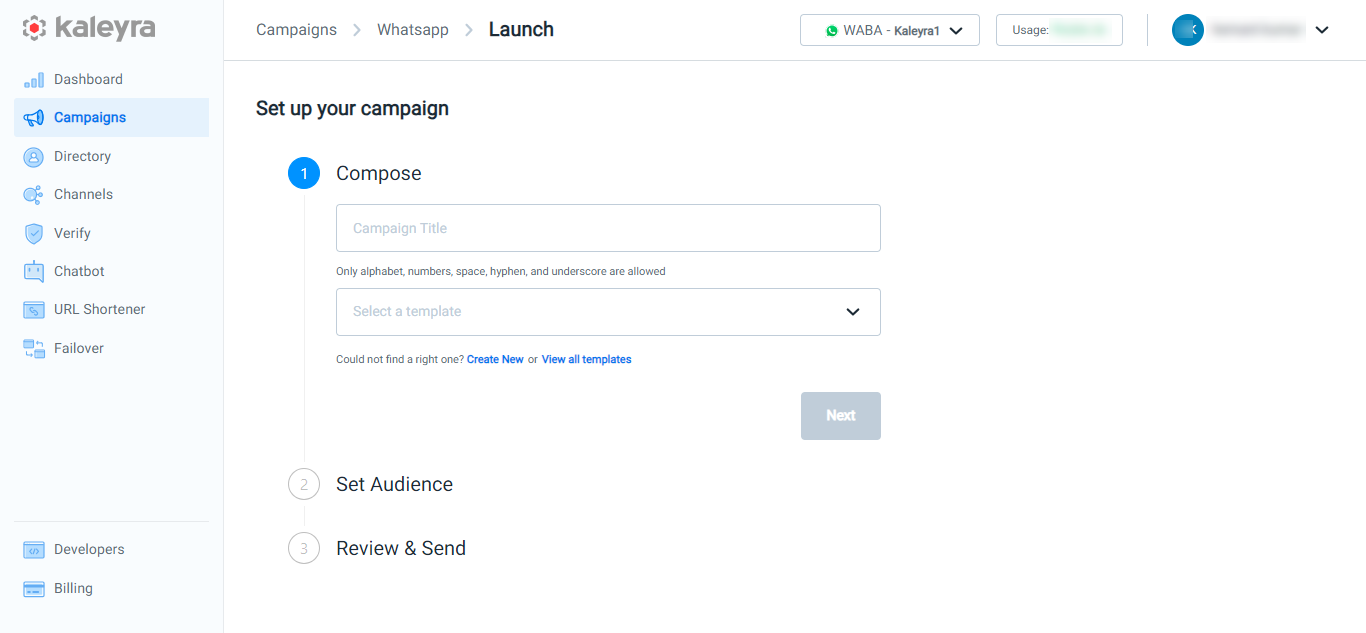
The page has the following three sections to capture all the necessary details before you launch a campaign
Compose,
Set Audience,
Review & Send.
Note:To know more about the Campaign list, see the WhatsApp Campaigns list section.
Compose
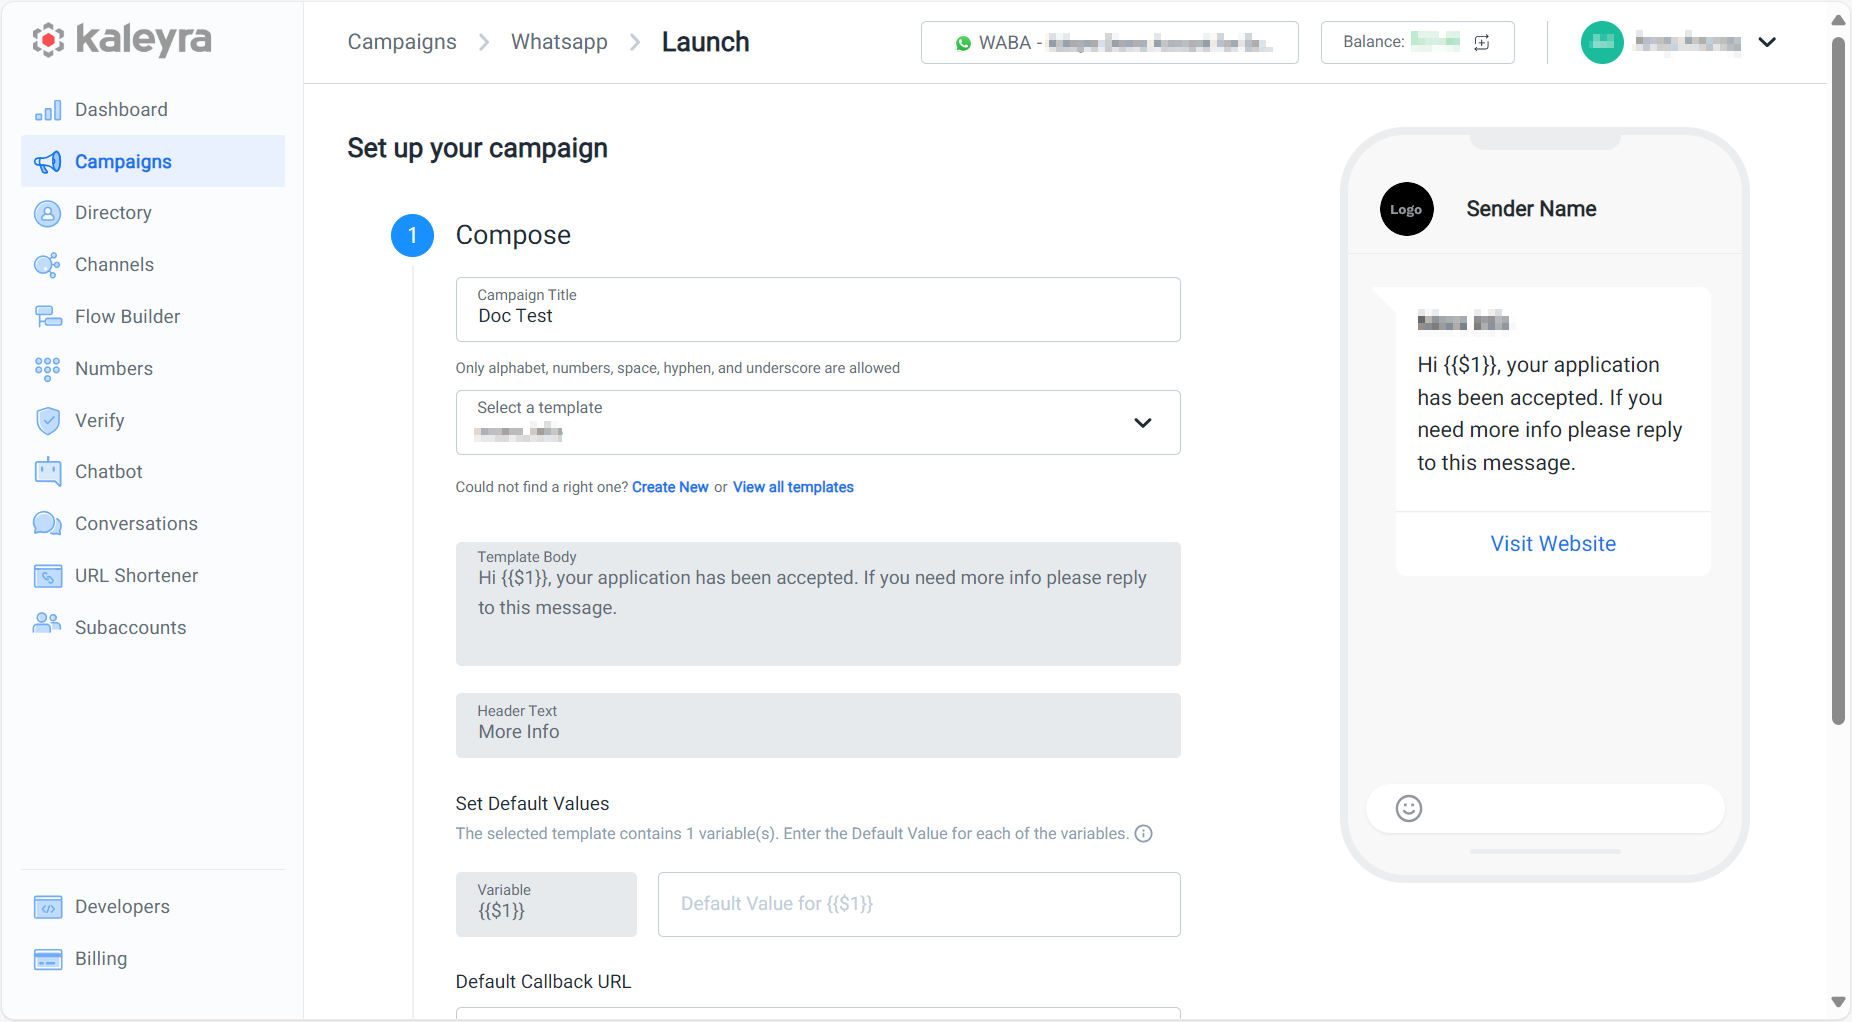
The Compose section of the WhatsApp Launch page helps you create the WhatsApp message body.
Notes:
- A message preview of your WhatsApp campaign appears on the right side of the Set up your campaign page after you select a template. It enables you to preview the message that the subscribers can view when they receive the message on WhatsApp.
- There will be a placeholder for the Sender Name on the top of the preview section until you select the To number and From number.
The Compose section of the Campaign page has the following fields.
- Campaign Title—Enter campaign name.
- Select a template—Select a WhatsApp template from the drop-down list or from View all templates.
The templates shown in the list are the ones associated with the WABA ID that you have selected from the WABA menu on the top of the Campaigns list page.- View all templates
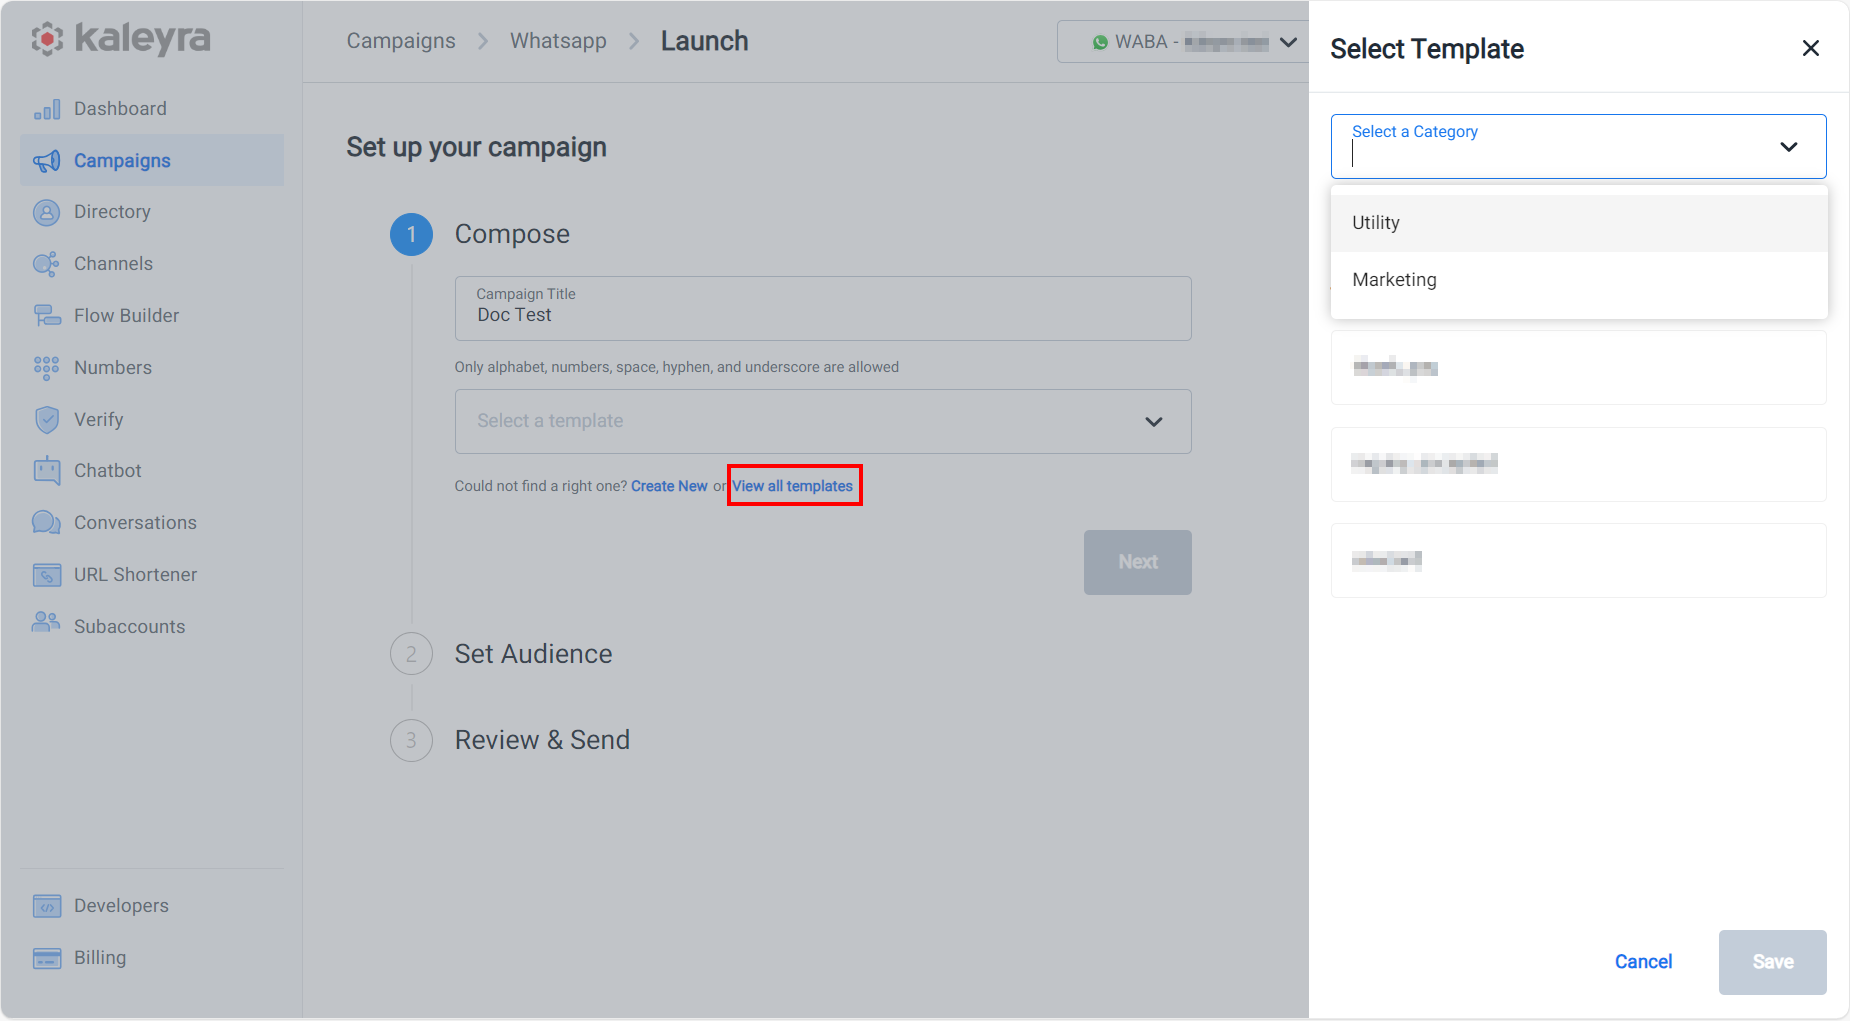
- Click View all templates.
The Select Template sidebar pop-up appears with a list of existing templates for the selected WABA ID. You can either filter the template by category or enter the template name. You can view the templates listed in the reverse order of creation date (the newest template is displayed at the top of the list). - Select the template you want to use in your campaign and click Save.
- Click View all templates.
- View all templates
- Select a template—Select a WhatsApp template from the drop-down list or from View all templates.
Notes:
- Make sure to select the correct WABA ID from the WABA menu on the top of the Campaigns list page that has the specific template you intend to use for the campaign.
- If you decide to select a different WABA ID after filling in the details for a few of the campaign fields, you will have to fill up the field details from the beginning.
- Create a New Template
Click Create New. The Add New Template page appears. To add a new template, see the Add WhatsApp Templates page. - Template Body—The template text of the selected template is displayed. The text cannot be edited as the template is pre-approved by Meta.
- Header Text—Upload an image/document/video file as the header of the message. Based on the template selected, you will see Upload Image File, or Upload Document File, or Upload Video File for the header field. This field appears only if the selected WhatsApp template for the campaign has a media header included as part of the template.
Alternatively, you can also enter the URL of the image/document/video file for the Header field.
An example of a template body text with an image in the header is shown.
- Website URL—Enter the URL path for the Base URL, if the Template Body includes a dynamic URL.
Base URL—The Base URL is picked up from the template.
URL Parameter—Enter the URL path. - Set Default Values—If the Template Body field has dynamic fields, specify the default values in the following fields for each of the dynamic fields.
Variable{{$1}}—The dynamic field used in the template is displayed.
Default value for{{$1}}—Enter the default value for the dynamic variable. This value will be used if the variable value is missing in the Contacts file that you can ‘Upload’ or ‘Import from Directory.’ Contacts who are imported using ‘Copy & Paste’ will receive the default value. - Default Callback URL—Enter a callback URL to get information about the statuses of the messages sent. You will receive messages for each of the message statuses such as sent, delivered, and read through this URL. These default values from these fields are used when the end customers do not have the variable values associated with them.
- Click Next.
The Set audience section is shown.
Set Audience
The Set Audience section helps you select the end-customers to whom you want to send the WhatsApp message.
Key points to consider when you select the customers:
- Make sure to add only those end-customers who have opted-in to receive WhatsApp messages as the ‘audience’ for the campaign. If you include the contacts who have opted-out and hence have been added to kaleyra.io blocklist, then for those contacts, the campaign message will not be sent.
- If the selected number of contacts for the campaign is more than the daily limit permitted for the WABA ID, then the campaign cannot be launched. You will see an error message for this when you try to ‘Launch’ the campaign.

Note:The logo will display the account's profile picture as a default. Once you enter the From number field in the Set Audience step, the logo will display the From number's profile picture, as available in Meta Business Manager (if available).
For more information on how to set a profile picture in your business account see, How to edit your business profile.
The Set Audience section of the Campaign page has the following fields.
- From—Select the number from which you want to send the WhatsApp campaign to the end customers.
- Import Contacts—Select the list of phone numbers of the end customers to send the WhatsApp message using one or all of the following ways.
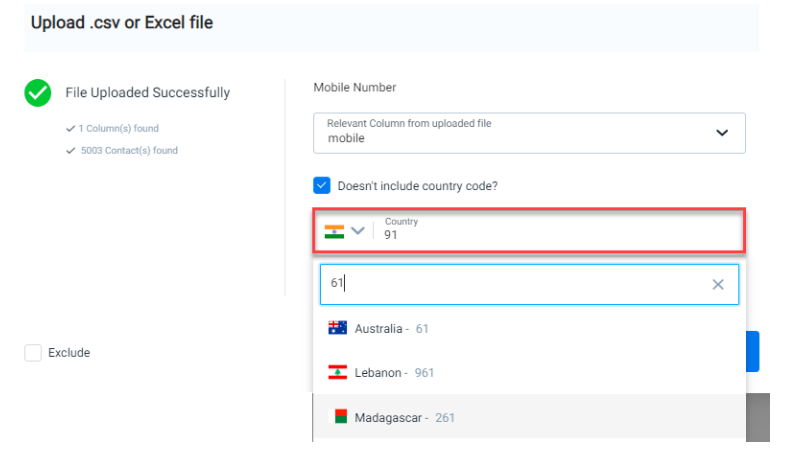
Upload .csv or Excel file
-
Upload a .csv file or an Excel file that consists of the phone numbers of the end customers. In the Excel file or the .csv file, make sure to add an appropriate column to pass the customized value for each dynamic variable you have used in your template including any media URL that must be shown to the individual customers. If any of the dynamic variables is not available in the file, then the default value is sent as part of the message; this is true also in the case of the dynamic URL used in the template.
In the Excel file or the .csv file,- Map the columns containing each variable against the dynamic variables used in the template.
- Add a column called 'media_url' for passing the customized media URL to be sent to each contact along with all the other column valuess for dynamic variables.
- Map the column containing the media URL to the media URL dynamic variable of your template.
Notes:
- If the uploaded file does not contain Country Code prefixed mobile numbers, then select the Doesn’t Include Country Code? checkbox and search for the appropriate Country Name or Country Code from the list.
- In the search bar, you are not required to prefix the Country Code with a + symbol.
- Click Import. You can view the contacts that have been imported.
Import from Directory
You can also import the contact numbers from an existing directory.
- Select the contact numbers from the directory.
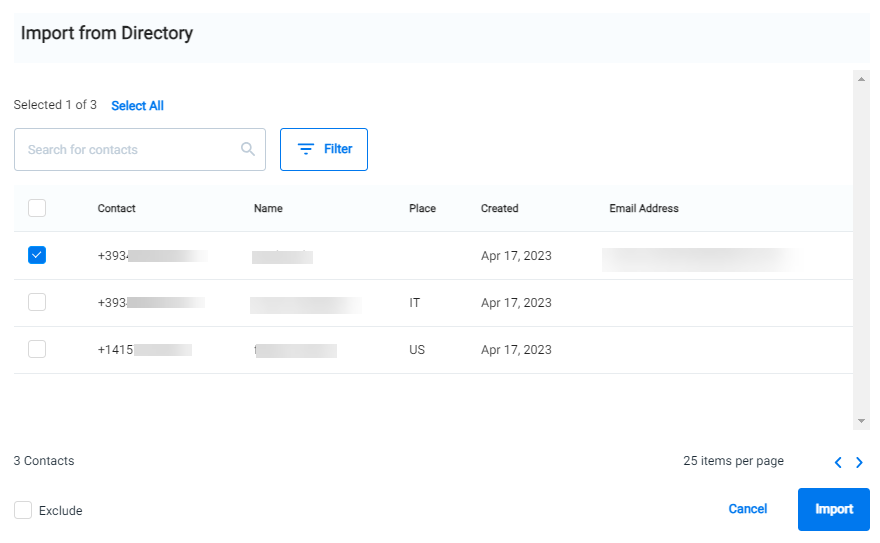
- Select the required contacts and click Import. For more information regarding the Directory, see https://developers.kaleyra.io/docs/directory-overview.
- Click Select All to select all the contacts in the list.
- Click Unselect All to remove the contacts from the list.
Copy & Paste Numbers
- Enter the list of phone numbers separated by newline
or copy and paste the list of phone numbers to send the WhatsApp message.
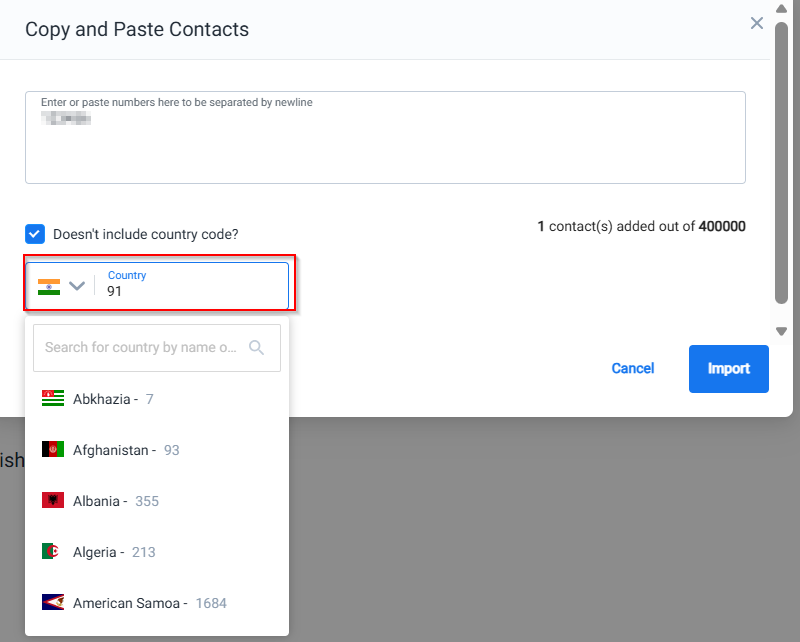
- Click Import. You can view the contacts imported under the Set Audience section.
Notes:
- If you have not entered the Country Code, select the Doesn’t Include Country Code? checkbox and search for the appropriate Country Name or Country Code from the list.
- In the search bar, you are not required to prefix the Country Code with a + symbol.
- Make sure the number of contacts selected for the campaign does not exceed the actual limit for the daily new business conversation of the phone number selected for the campaign.
To know more about the messaging limit of your WhatsApp phone number, see, Messaging Limits- You can add contact numbers using all three options available under the Import Contacts field.
- The maximum number of contacts supported in the Copy and Paste Contacts input field is 400000.
- Select the Exclude checkbox, if you want those contacts from the list to be excluded from receiving the message.
- Once you have reviewed the campaign, you can click Save as draft to save your campaign as a draft campaign so as to complete it later as needed. Draft campaigns are available on the Campaigns listing page. You can navigate to the Campaigns listing page to view the drafted campaign displayed with a Draft status. For more information, see the Draft WhatsApp Campaign page.
Notes:
- To enable the Save as draft option, you must first enter a campaign name, select Business Number under the Set Audience section, and import at least one contact.
- The Save as draft option is available under the Set Audience and Review & Send sections.
- Click Next, after adding contact numbers to send the WhatsApp message.
The Review & Send section is enabled.
Review & Send
The Review & Send section enables you to review the total recipients and the estimated cost of the campaign. The section also shows an estimated cost for sending the message to the selected contacts. The estimated cost is based on the number of contacts we are attempting to send in the campaign. After the campaign is closed, the billing is calculated based on the actual number of messages sent.
Schedule a WhatsApp Campaign
You can launch a campaign as soon as you create it (now) or send it later. While scheduling the campaign, you can also specify to split the launch into different batches (1000 to 1 million contacts per batch) and launch them with a time interval of 15 minutes up to 60 minutes.
However, for campaigns with more than one million contacts, the time interval between batches is 5 minutes by default and cannot be modified.
To launch a WhatsApp campaign now:
- In the Review & Send section, select the Now option in the Send this campaign field.
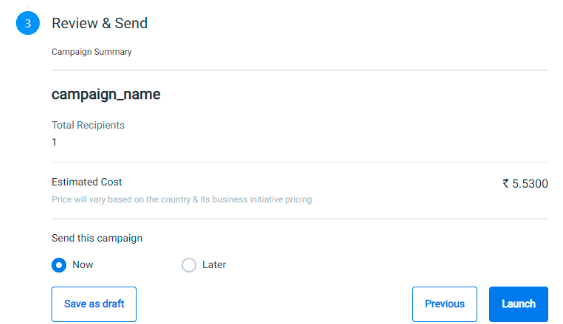
- Click Launch.
The WhatsApp campaign has been launched. - Alternatively, once you have reviewed the campaign, you can click Save as draft to save your campaign as a draft campaign so as to complete it later as needed. Draft campaigns are available on the Campaigns listing page. You can navigate to the Campaigns listing page to view the drafted campaign displayed with a Draft status. For more information, see the Draft WhatsApp Campaign page.
Note:If any campaign fails due to backend validation (like template or business-number), the corresponding failure reason is displayed.
To launch a WhatsApp campaign later:
- In the Review & Send section, select the Lateroption in the Send this campaign field.
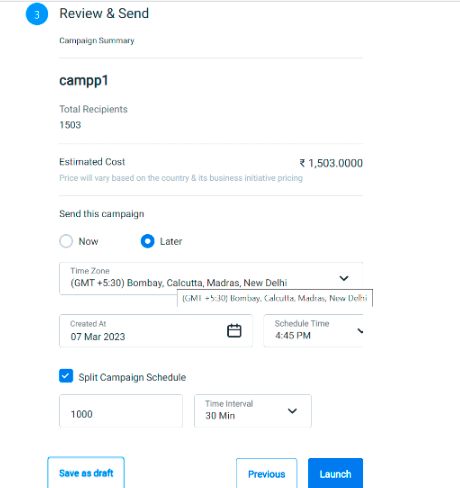
- Select the Time Zone based on which the campaign should be launched.
- Select the date and time at which the campaign should be launched. By default, the current date is displayed.
- Select the Split the Campaign Schedule checkbox, if you want to send the message to the contacts in batches.
- Enter the number of contacts to select in each batch in terms of 1000. For using the split option, you must have a contact number of more than 1000.
- Select the time interval at which each batch(of a minimum of 1000) should be launched.
- After you review all the details that you have entered, click Launch.
Note:If you have added duplicate contact numbers, you will see an option to remove the duplicate contacts after you click the Launch button. However, the application allows you to continue having duplicate contacts on the campaign list.
The WhatsApp campaign is launched to all the selected contact numbers as per the schedule.
WhatsApp campaign list
The WhatsApp campaigns list shows the campaigns that have been launched.
- After signing into your accountKaleyra.io account, go to Campaigns and then click WhatsApp.
The WhatsApp campaign list appears.
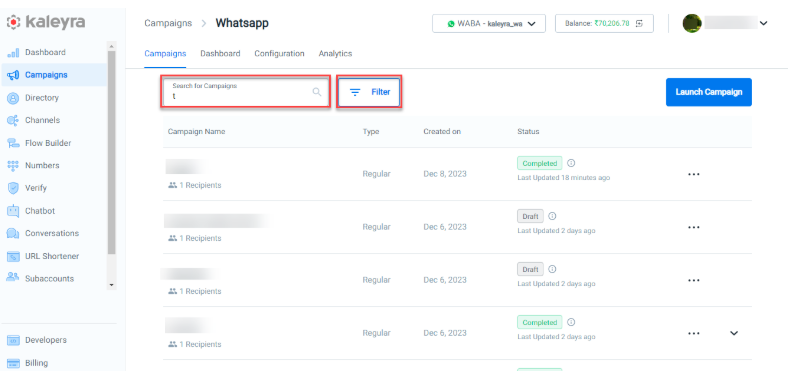
- To search for a specific campaign, click Filter on the WhatsApp campaigns list.
The Filter pop-up appears.
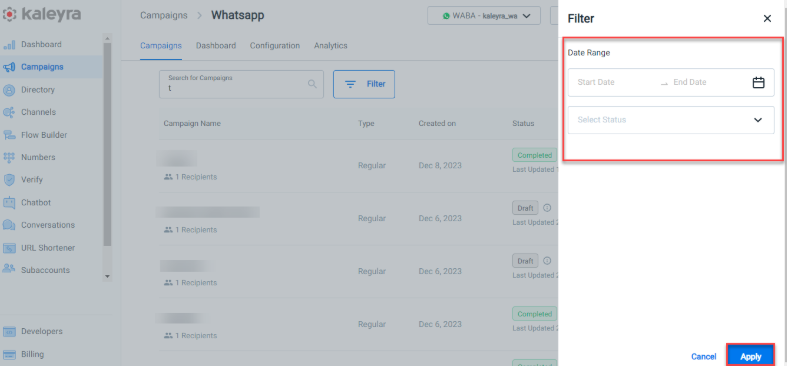
You can filter campaigns based on the created date and status.
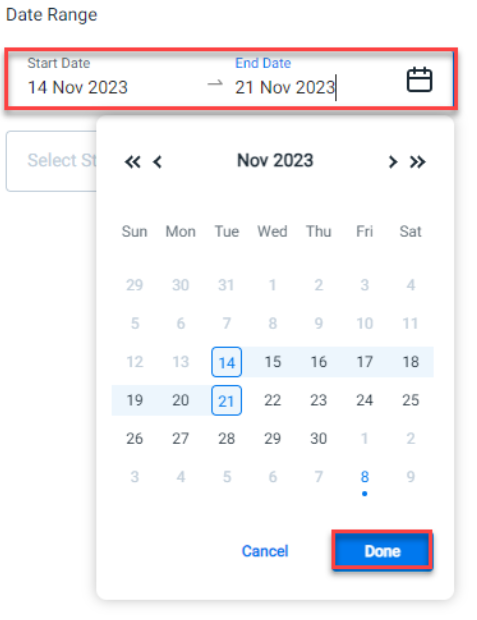
- Select the Start Date and the End Date from the Calendar icon and click Done. All the campaigns created between the given Start Date and End Date will be returned.
- Click the arrow next to Select Status to view the list.
Only one option can be selected from the Select Status field.
The different statuses of a WhatsApp Campaign are as follows:
- In Process - Messages are currently being sent to Meta.
- Submitted - Messages have been submitted to Meta.
- Completed - Messages have been acknowledged by Meta OR 3 days have passed since the Campaign was launched.
- Scheduled - The Campaign is scheduled to send messages at a later date and/or time.
- Draft - The Campaign has not been submitted or scheduled yet.
- Failed - Messages were unable to be submitted to Meta (either partially or completely).
- Deleted -The Campaign was deleted.
Note:The campaign status will be updated from In Process to Failed, if there are no updates on the message status received from Meta after three days or if the total count of messages acknowledged or received is less than 90 percent of the total campaign size.
The Campaign status will be updated from In Process to Submitted after twelve hours have passed since the campaign processing started or the total count of messages acknowledged or received by Meta is at least 90 percent of the total campaign size.
- Click Apply. The Campaigns list as per the selected filters appears.
- Click Clear all filters to delete all the applied filters.
Updated 4 months ago