Callback Advanced Authentication
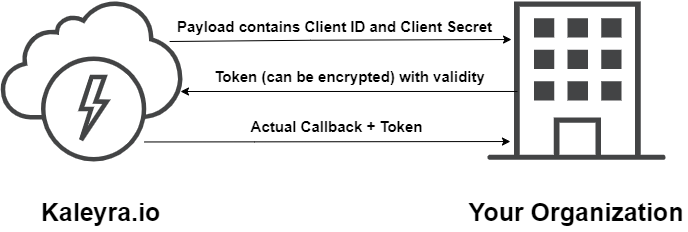
Kaleyra.io allows you to secure the communication between Kaleyra.io and your customer's systems (end users) when the given profile is used for the callback using Advanced Authentication. The Advanced Authentication allows you to generate a token that Kaleyra.io can use for callback responses. Token-based authentication is an authentication protocol where you can verify Kaleyra.io's identity by pre-configured client ID and client secret through payload in exchange for a unique access token valid for a defined duration to call your callback endpoint.
Note:You must contact the Kaleyra Support team to enable the Advanced Authentication option on your Kaleyra platform.
You can successfully configure Advanced Authentication for your Callback Profile by updating the auth type, HTTP methods for calling authentication URL, authentication URL, client ID, client secret, other required path details, authentication algorithm, and eventually optional custom headers.
Once the Advanced Authentication is set by you, when Kaleyra.io has to send a callback to your system, first of all, an authentication request is sent to the configured authentication URL to receive the access token. The authentication request contains among others, the configured Client ID and Client Secret. In response, your authentication system shares the access token that can be in encrypted form and valid for a specific duration. Kaleyra.io then adds the same token in the subsequent callback calls sent to your callback URL.
Sample response from the customer containing a token
The following is the sample response from the customer containing a token:
{
"token_type": "Bearer",
"expires_in": "3599",
"ext_expires_in": "3599",
"expires_on": "1686632570",
"not_before": "1686628670",
"resource": "00000002-0000-0000-c000-000000000000",
"access_token": "eyJhbGciOiJIUzI1NiIsInR5cCI6IkpXVCJ9.eyJzdWIiOiIxMjM0NTY3ODkwIiwibmFtZSI6Ikpva"
}
Sample request from Kaleyra.io after adding token shared by customer
The following is the sample request from Kaleyra.io after adding the token shared by the customer:
curl --location --request GET 'https://docdemo.com?custom_param=some_value' \
--header 'Authorization: Bearer eyJhbGciOiJIUzI1NiIsInR5cCI6IkpXVCJ9.eyJzdWIiOiIxMjM0NTY3ODkwIiwibmFtZSI6Ikpva'
Benefit
The following is the benefit of using Advanced Authentication:
- All callbacks will be authenticated towards the customer endpoint.
Supported Grant Types
The following is the list of supported and unsupported grant types:
| OAuth Grant Type | Supported | Notes |
|---|---|---|
| Client Credentials | Yes | |
| Password | Yes | |
| Authorization Code | No | It requires user interaction via a redirect URL. It is not supported. |
| Proof Key for Code Exchange (PKCE) | No | As an extension to the Authorization Code grant type. It is not supported. |
| Device Authorization | No | It requires user interaction via a redirect URL. It is not supported. |
| Refresh Token | No | It is not supported. |
To add a Callback Profile with an Advanced Authentication option, perform the following steps:
- Follow Step 1 to Step 11 of the Callback Profiles.
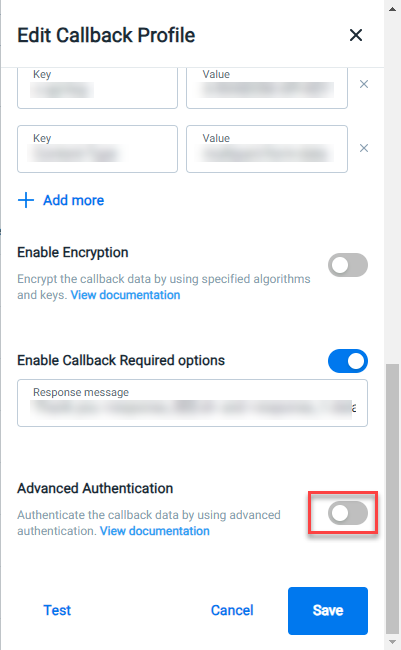
- Click the Advanced Authentication toggle button.
The Advanced Authentication detail appears.
- Enter the following details:
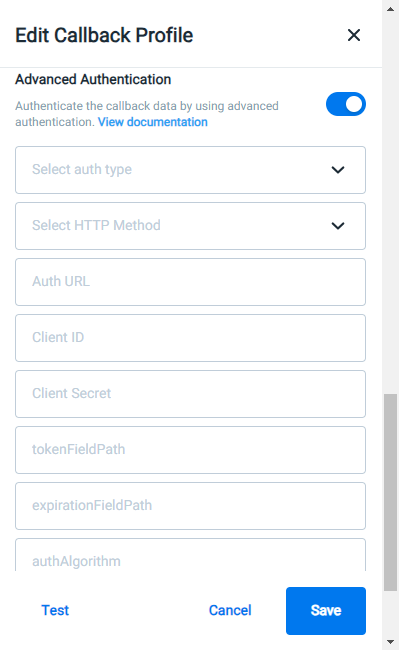
- Click the Select auth type dropdown to view the list of supported authentication types you want to use to validate the callback calls from Kaleyra.io. Currently, Kaleyra.io supports Oauth 2.0.
- Click the Select HTTP Method dropdown to view a list of HTTP methods. Select the HTTP method type you want to send the Advanced Authentication. For example, POST.
- In the Auth URL field, enter the endpoint URL Kaleyra.io has to call to request the access token. For example,
https://docdemo.com/oauth2. To generate the token Client ID and Client Secret details are required. - In the Client ID field, enter the client ID that you want to use to generate the token. For example,
MDXXXXTM3NXXXXDUXXXXm. - In the Client Secret field, enter the client's secret that you want to use to generate the token. For example,
UXXXXXXXXXXnN6eURNN2NtUg. - In the tokenFieldPath field, enter the attribute name where you will send the token back in the authentication response.
- In the expirationFieldPath field, enter the attribute name where you send back in the response the validity time of the generated token.
- In the authAlgorithm field, enter the algorithm you will use to encode the token before sending it back to kaleyra in the authentication response. For example, RSxx6.
- (Optional) In the Headers field, enter any additional values as Key-Value pairs that you need for Advanced Authentication. These values are additional information that you may request to receive in the authentication request from Kaleya.io to your authentication URL.
- (Optional) After you enter the first Key-Value pairs, to add more Key-Value pairs, click + Add More.
- Follow Step 12 and Step 13 of the Callback Profiles.
Updated 12 days ago