Kaleyra WhatsApp Integration with MoEngage
GET Method
This page covers the following topics:
Create WhatsApp Campaign through Kaleyra using MoEngage
To create a WhatsApp campaign through Kaleyra.io using MoEngage, perform the following steps:
- On the MoEngage dashboard, navigate to Engage.
- Go to Campaigns, Create Campaign, and then Connectors.
- Click Create Custom Connector. Update campaign information and segment data.
- In the Request Limit section, enter the number of requests per minute.
Note:The maximum number of requests per minute is 3500.
POST Method
- Select the POST method for Kaleyra SMS integration.
- In the Input field, enter the Webhook URL of Kaleyra WhatsApp as in the example URL.
Example URL:
- Add the SID (Security Identifier) in the above request from your Kaleyra account. For more information on generating an API key, see Generating an API Key. To view the API Key and the SID, see View API Key and SID.

- Select the Headers section to add the following keys and their corresponding values.
| Key | Value |
|---|---|
api-key | Ac4XXXXX21f |
Content-Type | application/x-www-form-urlencoded |
- Select the URL Parameters section to add the following keys and their corresponding values. Select the content type as form-urlencoded.
| Key | Value |
|---|---|
channel | |
to | {{UserAttribute['Mobile']}} (Use @ mobile) |
from | Add Approved WhatsApp Business Number |
type | template |
template_name | Add Template Name Registered on Facebook |
lang_code | Add Language registered on Facebook. Example - en |
template_parameters | "Parameter 1", "Parameter 2" |
callback_url | Add callback URL here |
- Click Test Campaign to preview the configuration.
- Click Save to save the settings.
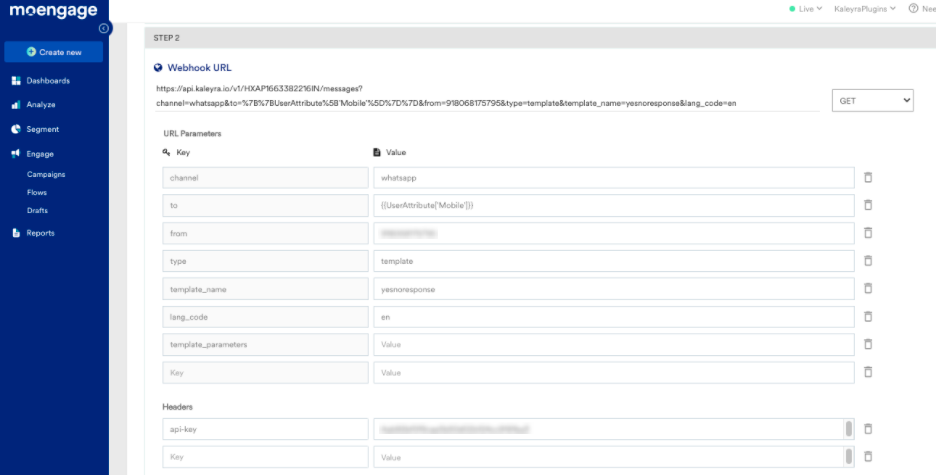
GET Method
- Select the GET method for Kaleyra SMS integration.
Note:For the GET method, the body should always be URL encoded.
- Select the Authentication tab and add the HTTP API endpoint as in the example URL.
Example URL:https://api.kaleyra.io/v1/SID/messages?channel=whatsapp&to=%XX%XXUserAttribute%XX'Mobile'%XX%XX%XX&from=
<Whatsapp Number>&type=template&template_name=template Name&XXXX_XXXX=en
- In the Headers section, add the following key and their corresponding value:
| Key | Value |
|---|---|
api-key | Ac4XXXXX21f |
Content-Type | application/x-www-form-urlencoded |
- Select the URL Parameters section to add the following keys and their corresponding values. Select the content type as form-urlencoded.
| Key | Value |
|---|---|
SID | Generating an API key. To view the API Key and the SID, see View API Key and SID. |
Sender ID | Creating Sender ID |
Type | (Indian Customer - OTP/MKT/TXN; Non-Indian Customers - Default) |
- Click Test Campaign to preview the configuration.
- Click Save to save the settings.
Updated 7 months ago
