Create WhatsApp Campaign on WebEngage
Prerequisite:
- Ensure that the WhatsApp templates are approved and uploaded. For more information, see Add WhatsApp Templates.
To create a WhatsApp campaign on WebEngage, perform the following steps:
- Login to WebEngage account.
- From the left navigation bar click WhatsApp. The WhatsApp page appears.
- Click + button. The Select a Campaign Type page appears.
- Select the type of campaign you would like to create. The Create WhatsApp Campaign page appears.
The Create WhatsApp Campaign page has the following options:
- CAMPAIGN NAME - Enter the unique campaign name.
- CAMPAIGN TAGS - Select the campaign tags from the drop-down list.
- CAMPAIGN TYPE - You can click the edit button to change the campaign type.
- AUDIENCE TYPE - You can choose to target a specific segment of users or combine several segments to define your WhatsApp campaign's audience. There are two available options:
- Send to users in single segment - Select Send to users in the single segment to target all users who are included within a particular segment.
- Send to users in multiple segments and/ or Don't send to users in certain segments - Select Send to users in multiple segments and/ or Don't send to users in certain segments to define the target audience by including/excluding multiple segments.
SEND TO - Select send to from the drop-down list. Click + button to create a new segment. Refer to Create a New Segment for detailed information.
- Click SAVE & CONTINUE. The Campaign page appears.
The Campaign page has the following sections:
Campaign Type & Schedule
Here you can specify when and how often the target audience should receive your campaign.
The CAMPAIGN TYPE and DELIVERY TIME have the following options:
- One-time
- Triggered
- Recurring
One-time Campaign
These are stand-alone messages that are sent to your users only once and generally comprise time-bound offers, festive deals, product updates, and so on. Such campaigns end as soon as they are delivered to the target audience.
- Choose the CAMPAIGN TYPE as One-time.
- Specify the below DELIVERY TIME.
- Now - Select Now to send the campaign immediately.
- Later - Select Later to schedule the campaign. If Later is selected, you can send messages as per each user's time zone by selecting In User's Time zone from the last drop-down list.
Triggered Campaign
These are ongoing cycles of communication that are sent to only those users of your target audience, who perform a particular event on your app/website.
- Choose the CAMPAIGN TYPE as Triggered.
- Select the event from the drop-down list. The available options are WhatsApp Accepted, Read, Rejected, Failed, and Sent.
- Specify the DELIVERY TIME as:
Send as soon as the event occurs to deliver the campaign immediately.
Wait for (duration) and then send to deliver the campaign after some time. You can set up a wait time in Minutes, Hours, or Weeks, after which, the campaign will be sent to the respective users. - Specify the START DATE from the Calendar icon on which the recurring campaign should start getting delivered to the target audience.
- Now - Select Now to send the campaign immediately.
- Later - Select Later to schedule the campaign.
- Specify the END DATE as Never or Till.
- Never - Select Never to run the campaign indefinitely.
- Till - Select Till to run the campaign till the specified date.
Recurring Campaign
These are ongoing cycles of communication that are scheduled to be sent periodically to its target audience.
- Choose the CAMPAIGN TYPE as Recurring.
- Specify the START DATE from the Calendar icon on which the recurring campaign should start getting delivered to the target audience.
- The frequency of a recurring campaign can be set as:
- Day, at a specific Time
- Week, at a specific Day and Time
- Month, on a specific day of the Month and Time
- Specify the End Date on which the campaign should cease getting delivered to the target audience.
- Never - Select Never to run the campaign indefinitely.
- Till - Select Till to run the campaign till the specified date.
Frequency Capping, DND, Queueing & Throttling
The Frequency Capping, DND, Queueing, and Throttling features allow you to manage the frequency and timing of campaign delivery for each user.
The FC feature has the following options:

- Select Follow Frequency Capping settings.... to send the campaign as per your account's frequency capping and time gap settings.
- Select Ignore Frequency Capping settings... to ensure campaign delivery even if the frequency cap for the day/week/month has been met for a user.
The DND feature has the following options:

- Select Follow DND settings.... to ensure that users aren't disturbed by the message at the hours specified by you (as per their time zone)
- Select Ignore DND settings...to ensure campaign delivery even if DND hours are applicable to a few users.
The QUEUEING feature has the following options:

- Select Queue message for up to...,to enable the feature and specify a custom queueing duration for the campaign in Minutes, Hours or Days.
- Select Do not Queue messages... to drop the message if we're unable to deliver it to a user due to FC/DND settings.
The THROTTLING feature has the following options:

-
Select Do not throttle campaign... to send all messages instantly to the entire target audience.
-
Select Throttle campaigns as per channel throttling limits to control the number of messages delivered per minute.
-
Select Throttle campaigns at... to specify a custom message throttling duration for this campaign.
-
Click SAVE & CONTINUE. The Select a Template page appears.
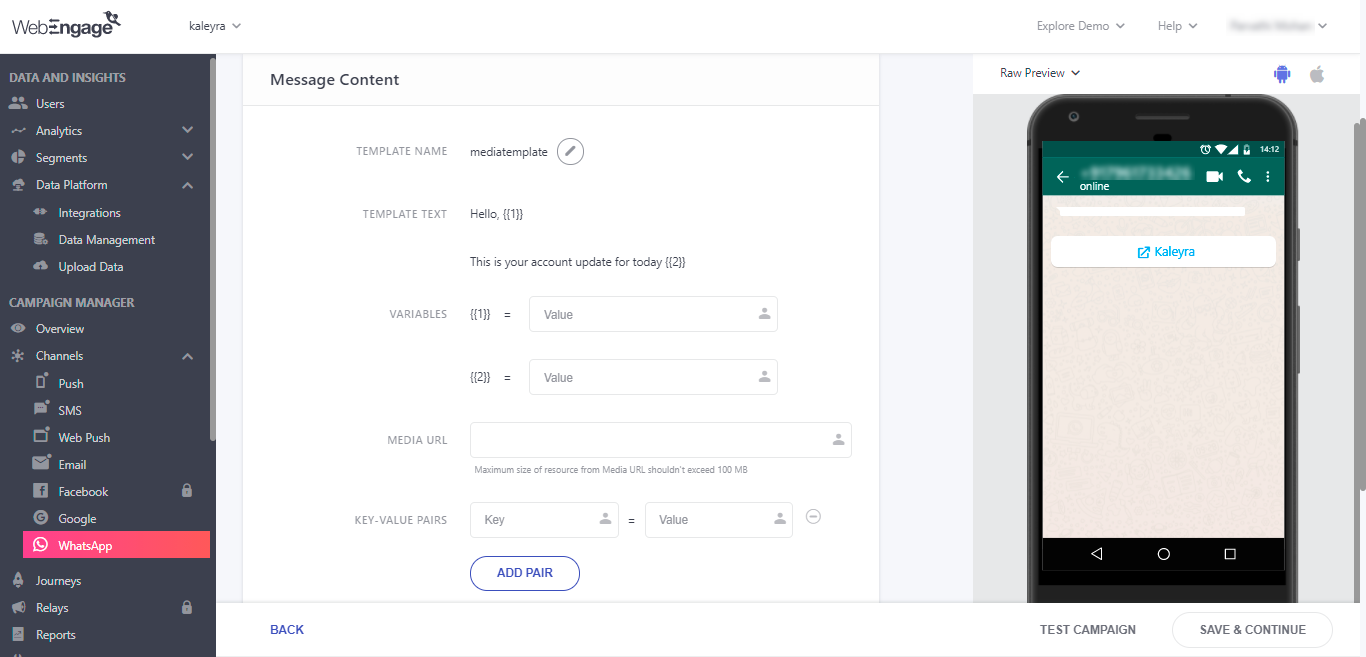
- From the Select a Template page, click on the desired row. The Message Content page appears
Updated about 1 year ago