Kaleyra WhatsApp with LeadSquared
This page covers the following topics:
- Pre-Requisites
- Installation
- Configuration
- Send WhatsApp Messages to one or more Leads
- Send WhatsApp Messages to Lists
- Add, Edit and Delete WhatsApp Templates
Pre-Requisites
- An existing account with Kaleyra. Or you can register for a new one at https://kaleyra.io
- A valid Facebook business account that has approved WhatsApp numbers and templates associated with Kaleyra as the BSP.
- Generate an API key in your Kaleyra account. Refer to Generating an API Key and Security Identifier] for more information. To view the API Key and the SID, see View API Key and SID.
Installation
To integrate Kaleyra WhatsApp on LeadSquared, perform the following:
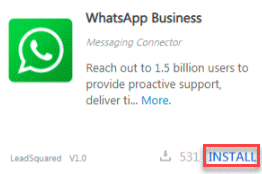
- Login to your LeadSquared application and head to the Apps Marketplace.
- Search with the keyword WhatsApp.
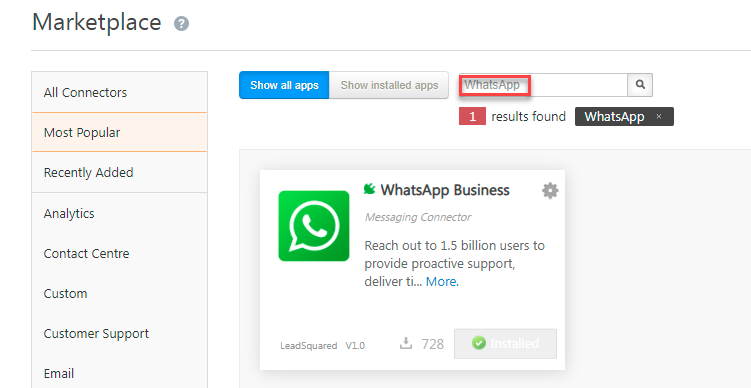
- Click INSTALL on the WhatsApp Messaging Connector plugin.
Configuration
To configure Kaleyra WhatsApp with LeadSquared, perform the following steps:
- Once installed, hover your cursor over the Settings icon and then click Configure. The Configure WhatsApp Business page appears.
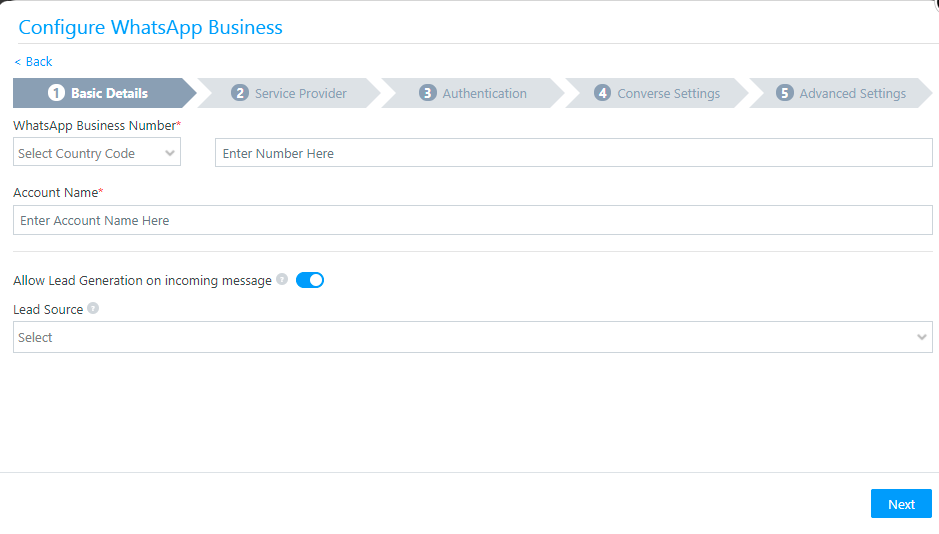
- Under the Basic Details section, enter the following parameters:
WhatsApp Business Number - Enter the WhatsApp Business Number.
Account Name - Enter the Account Name in the text box.
Allow Lead Generation on incoming message - Toggle the allow lead generation on incoming message to enable Lead Source option.
Note:In Inbound lead generation, lead creation happens by someone filling out a form and giving their contact details.
- Click the arrow next to Lead Source to select the options.
Note:If the lead is received without source, this default method by which a prospect found the product or service will be selected.
- Click Next. The Service Provider Selection page appears.
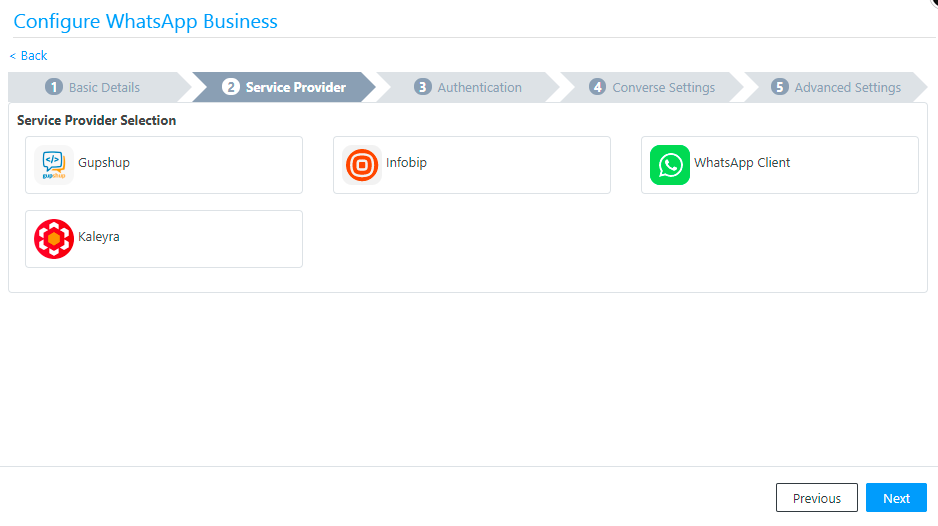
- Select Kaleyra as the service provider.
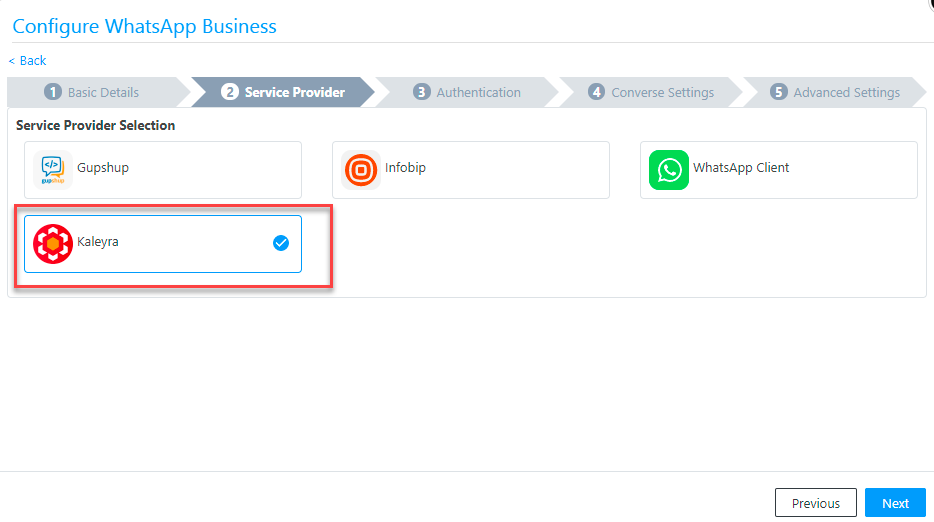
- Click Next. The Authentication page appears.
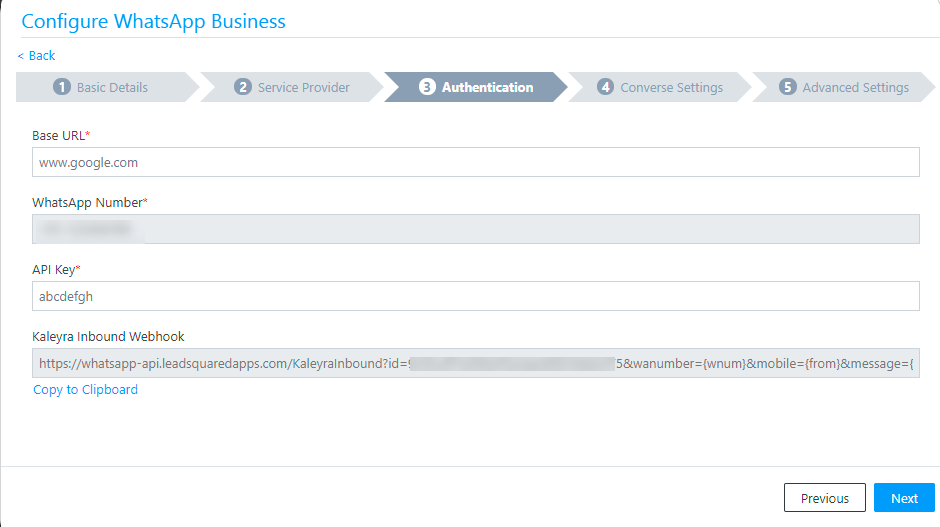
Under the Authentication tab, enter the following parameters:
Base URL - Enter the Base URL in the text box.
Example: https://api.kaleyra.io/v0/SID/messages
- Use the SID from the key generated on Kaleyra.io.
API Key - Enter the alphanumeric key in the text box.
- Use the key generated on Kaleyra.io.
Refer to Create an API Key for more information. To view the API Key and the SID, see View API Key and SID.
Kaleyra Inbound Webhook - The Webhook URL is disabled by default.
- Copy the ‘Kaleyra Inbound Webhook’ parameter.
- Go to Kaleyra.io and then click Channels.
- On the WhatsApp page, click Manage and then click Configurations tab.
- Under the Numbers tab, select the number you want to edit and then click the Edit icon.
Paste the parameter under the Incoming URL field.
- Click Next. The Advanced Settings page appears.
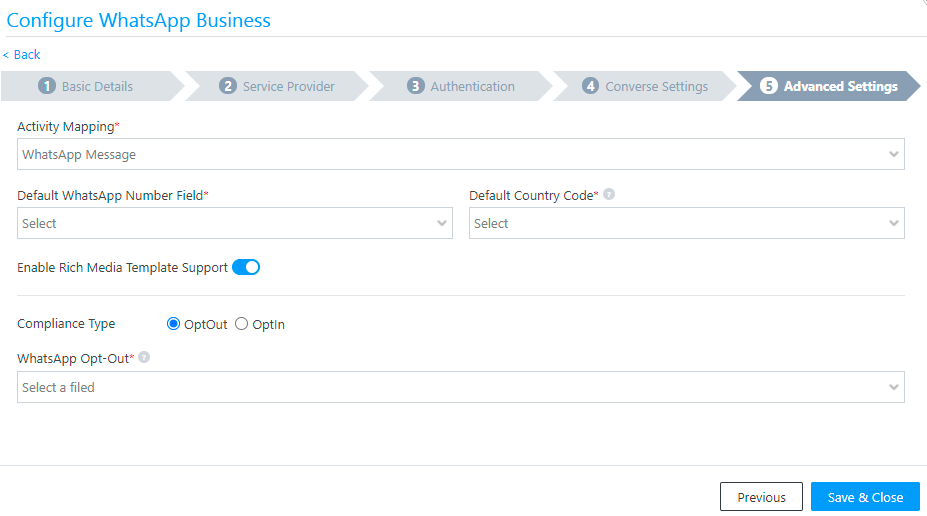
Under the Advanced Settings section, enter the following parameters:
Activity Mapping - Click the arrow next to Activity Mapping to view the list. A LeadSquared activity field to your WhatsApp messages. This is the activity that will be posted every time a WhatsApp message is sent or received.
Default WhatsApp Number Field - Click the arrow next to Default WhatsApp Number Field to view the list. The number you set as the default phone number will be automatically selected when you are sending a WhatsApp message to a lead.
Default Country Code - Enter Default Country Code in format + Country Code i.e. +1.
Note:If the lead is received without the country code, default country code will be appended.
Enable Rich Media Template Support - If you want to include media files in your WhatsApp message, you must enable the slider.
Compliance Type - Here, you can select the compliance type for the WhatsApp template, by choosing either WhatsApp Opt-out or Opt-in.
OptOut - Send Message to Only Opted-in members (Excluding Opted-out).
Opt-In - Message will be sent to all the leads except Opt-Out fields.
WhatsApp Opt-out – Select a lead field for the WhatsApp opt-in/opt-out functionality. Your leads can opt-in or out of receiving WhatsApp messages on the basis of this field.
- Once you are done entering the required details, click Save & Close.
Send WhatsApp Messages to one or more Leads
To send a WhatsApp to a lead, perform the following steps:
- On the menu bar, navigate to LEADS and click Manage Leads. The Manage Leads page appears.
- From the Manage Leads page, select one or more leads you want to send the WhatsApp to.
- Hover your cursor over the Settings icon, hover over Messaging, and then click WhatsApp. The Send WhatsApp Message page appears.
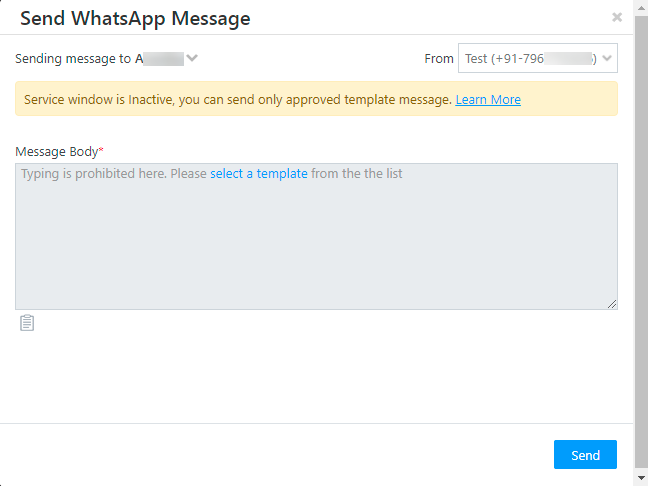
- On the Send WhatsApp Message page, you will find the Service Window. While using this window, you should remember the following:
- You cannot edit the template message on the Send WhatsApp Message page.
- If a lead replies to your message for the first time, then Inactive will change to Active for 24-hours.
- During this 24-hour window, you can send session messages along with template messages.
- The Service Window will get reset every time the lead replies to a message.
- On the Send WhatsApp Message pop-up, select a template and click Send.
Send WhatsApp Messages to Lists
To send a WhatsApp to a list, perform the following steps:
- On the menu bar, navigate to LEADS and click Manage Lists. The Manage Lists page appears.
- From the Manage Lists page, select the desired row you want to send the WhatsApp message to.
- Under the Actions column, hover your cursor over the Settings icon hover over Messaging, then click WhatsApp. The Send WhatsApp Message page appears.
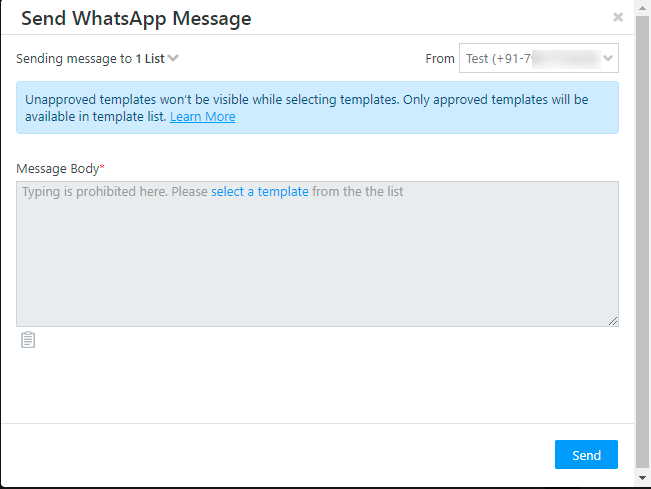
- On the Send WhatsApp Message pop-up, select a template and click Send.
Note:Unapproved templates won’t be visible while selecting templates. Only approved templates will be available in the template list.
Add, Edit and Delete WhatsApp Templates
WhatsApp templates must be submitted for Facebook approval from your Kaleyra user account. The templates need to be reviewed by WhatsApp to ensure that they do not violate any of their policies.
Once your templates are approved, you can add them to your LeadSquared account.
To add a WhatsApp template, perform the following steps:
- On the menu bar, navigate to APPS and click WhatsApp Templates. The Manage WhatsApp Templates page appears.
- On the Manage WhatsApp Templates page, click Add Template. The Add/Modify Template page appears.
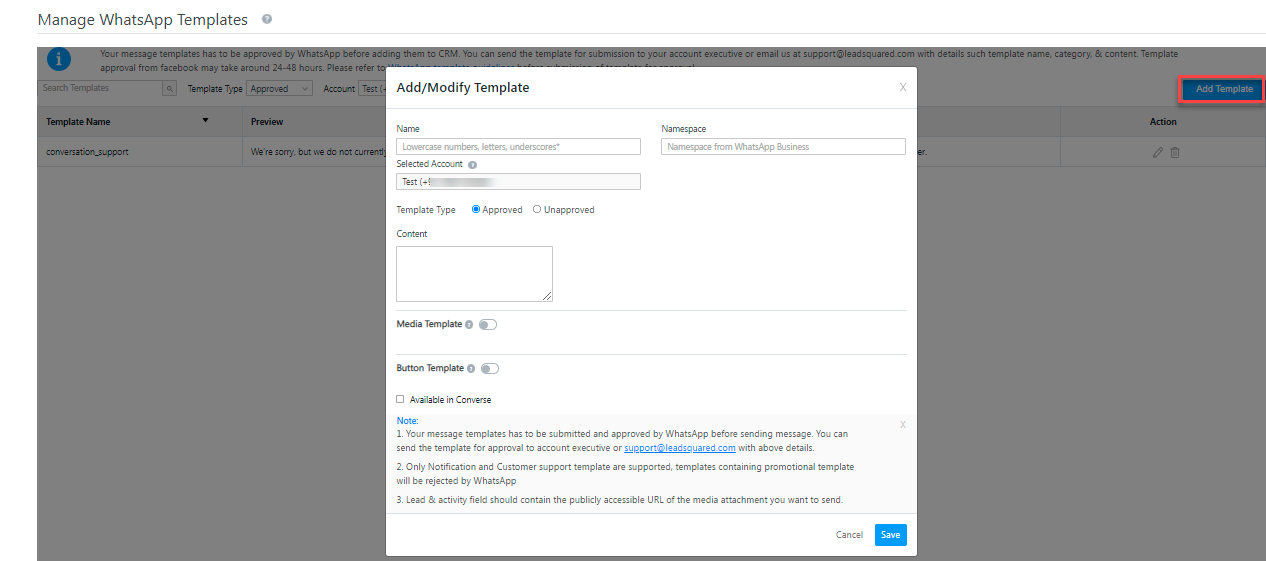
- Enter the Name, Namespace, and Content of your message template. A namespace is a static value that is created once Facebook approves your account. This is an organization-specific value. You may contact the Kaleyra support team to get the value.
- On the Add/Modify Template page. Toggle the slider against Media Template. The Image, Video, Document, and Text Header And Footer option is enabled.
- To attach an image, click Image. Format supported is image/jpeg, image/png, and the size is 5 MB.
- To attach a Video file, click Video. Format supported is video/mp4, video/3gpp, and the size is 16 MB.
- To attach a document file, click Document. Format supported is video/mp4, video/3gpp, and the size is 16 MB.
- To attach a Text Header And Footer file, click Text Header And Footer.
- Image Details (Default Value) - You can insert the file into the template by entering the file URL in the Image Details field. Alternatively, you can attach the file from your desktop by clicking the attachment icon to upload it.
- Video Details (Default Value) - Click the attachment icon and choose a video/mp4 file to specify a URL or upload an attachment.
- Document Details (Default Value) – Click the attachment icon and choose a file to specify a URL or upload an attachment. If the field you specify is null (if there is no URL contained in the specified field), this attachment will be sent in the WhatsApp message.
- Toggle the Button Template to enable the button types.
- Select Button Type from the radio button. The options available are Static and Dynamic.
- Static - Select Static radio button.
- Dynamic - Select the Dynamic radio button and enter the following details:
Default file name (applicable only to document type template) – Enter the default file name of the attachment.
Object – Select the object from the drop-down list. The options available are Lead and Activity.
Field – Select the field from the drop-down list.
- Click Save to save the file.
- Click Cancel to cancel the application and return to the Manage WhatsApp Templates page.
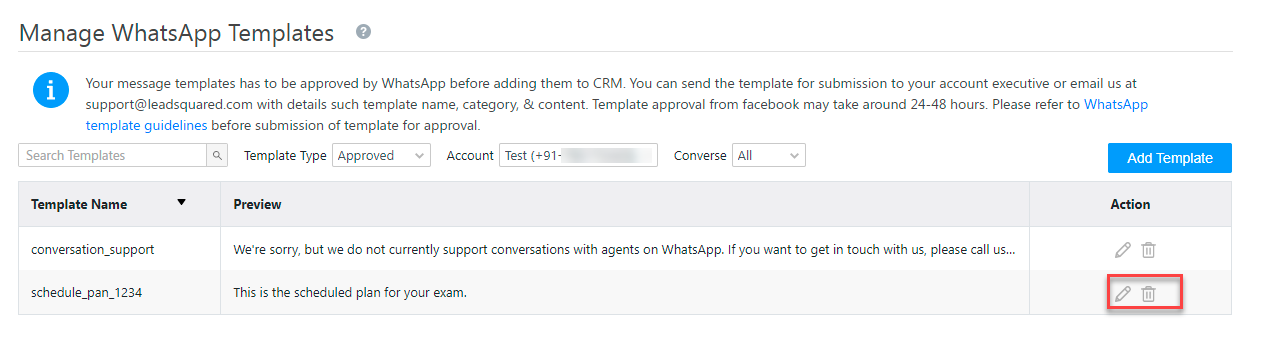
- Use the action buttons to Edit or Delete an existing template.
Updated about 1 year ago