Launch a Voice Campaign
Prerequisites:
- Complete the KYC process. For more information on the KYC process, see the Complete the KYC page.
- Ensure you have a sufficient balance left (prepaid user) or enough monthly usage available (postpaid user) to launch your Voice campaign.
- An Active number subscription.
- Optionally a published flow in Flow Builder (in case you wish to connect a flow).
To launch a Voice campaign, perform the following steps:
- Sign in to your Kaleyra.io account.
The Channels page appears.
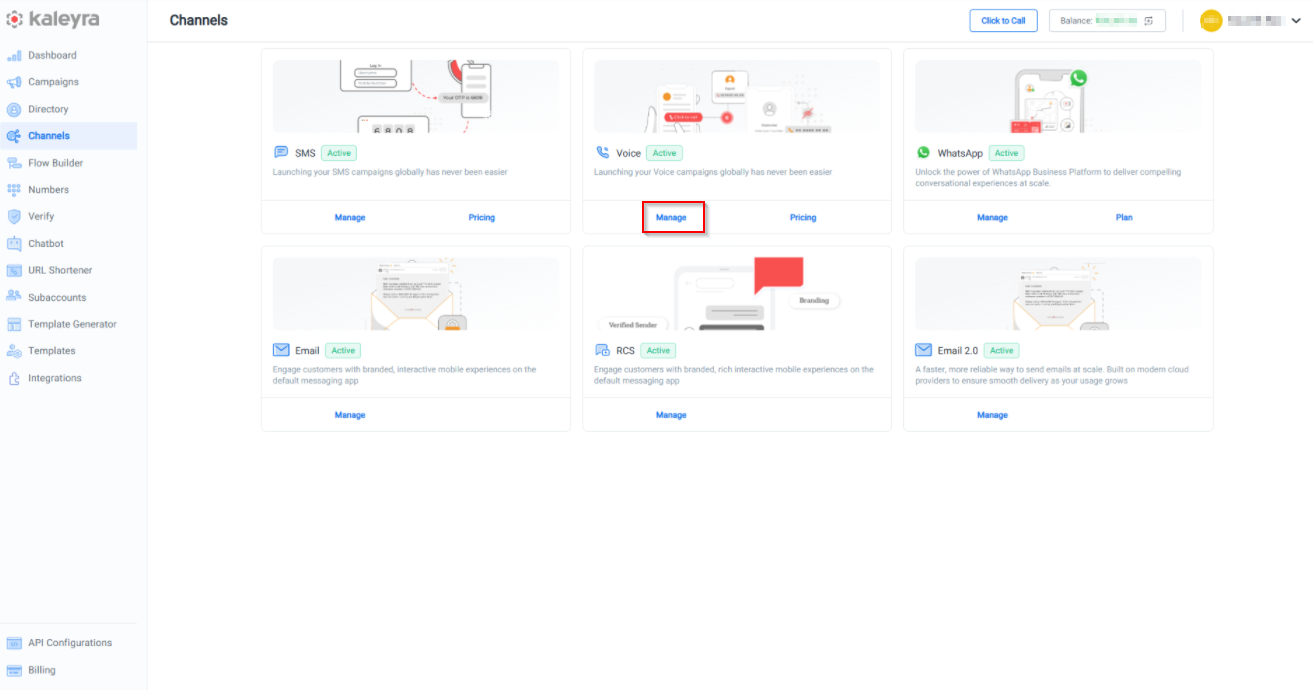
- On the Voice card, click Manage. The Logs tab details appear.
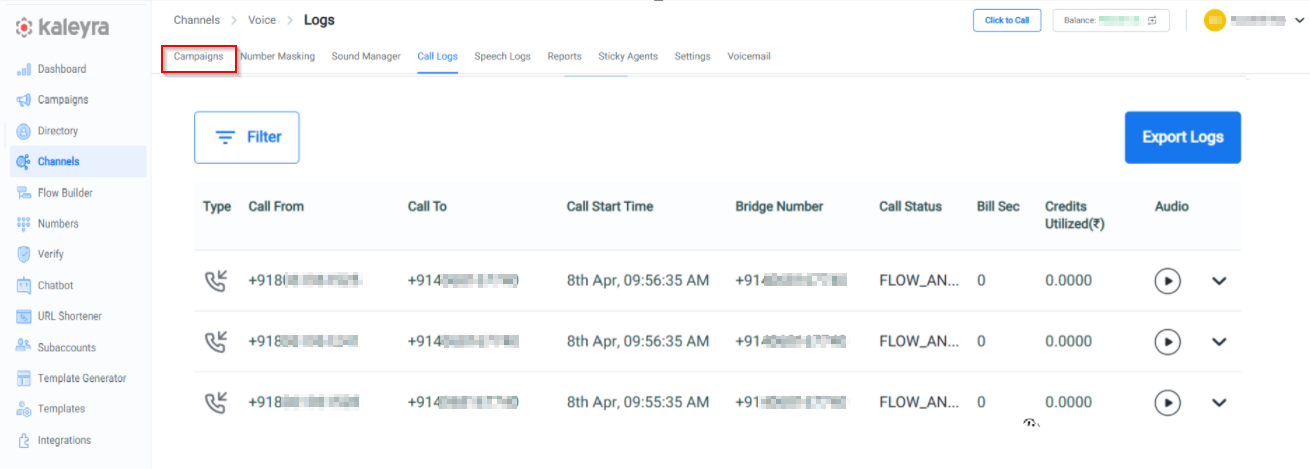
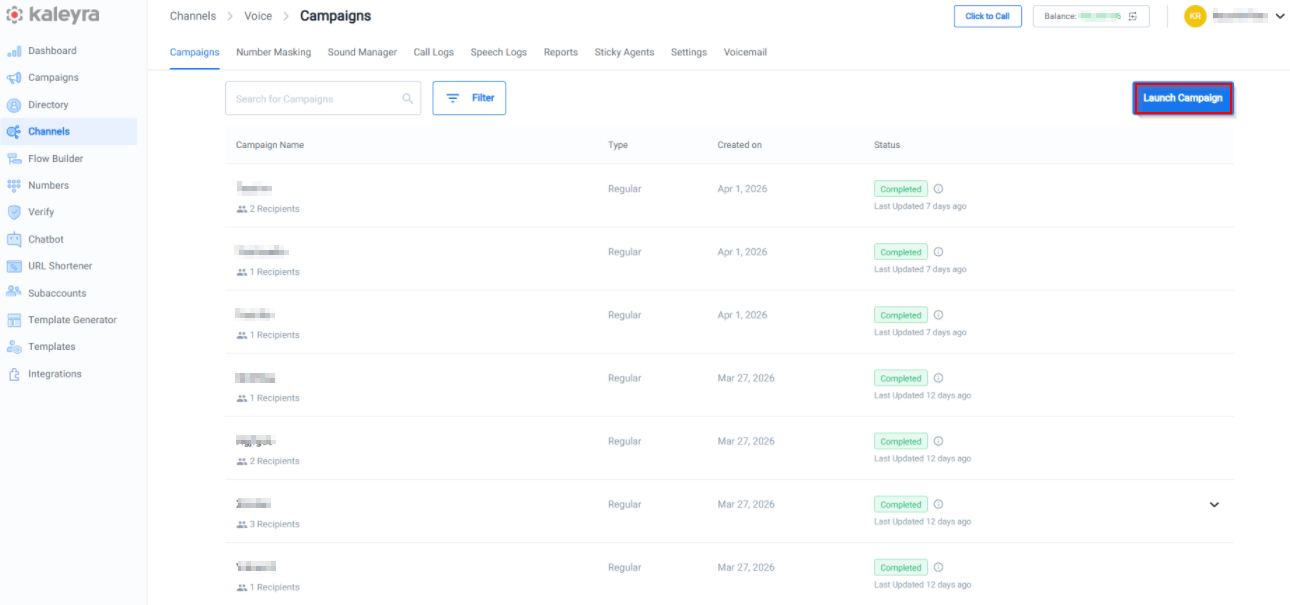
- Click Campaigns. The Campaigns listing page appears.
The list shows the campaign names, the type of campaign, the date of campaign creation, and the campaign status for all the past campaigns.
- In the Search for Campaigns field, enter the complete or partial campaign name for which you wish to search, and the respective campaigns list appears.
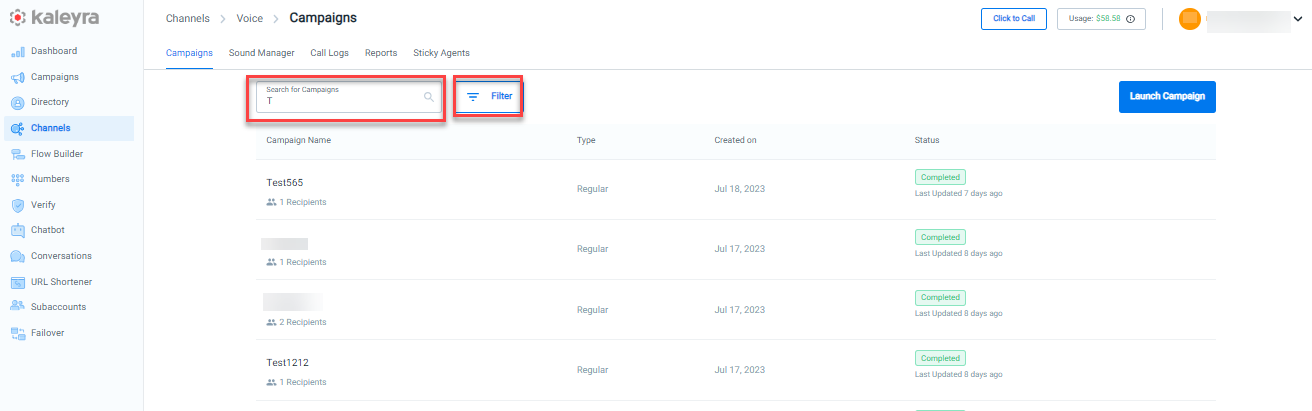
- Click Filter. The Filter pop-up appears.
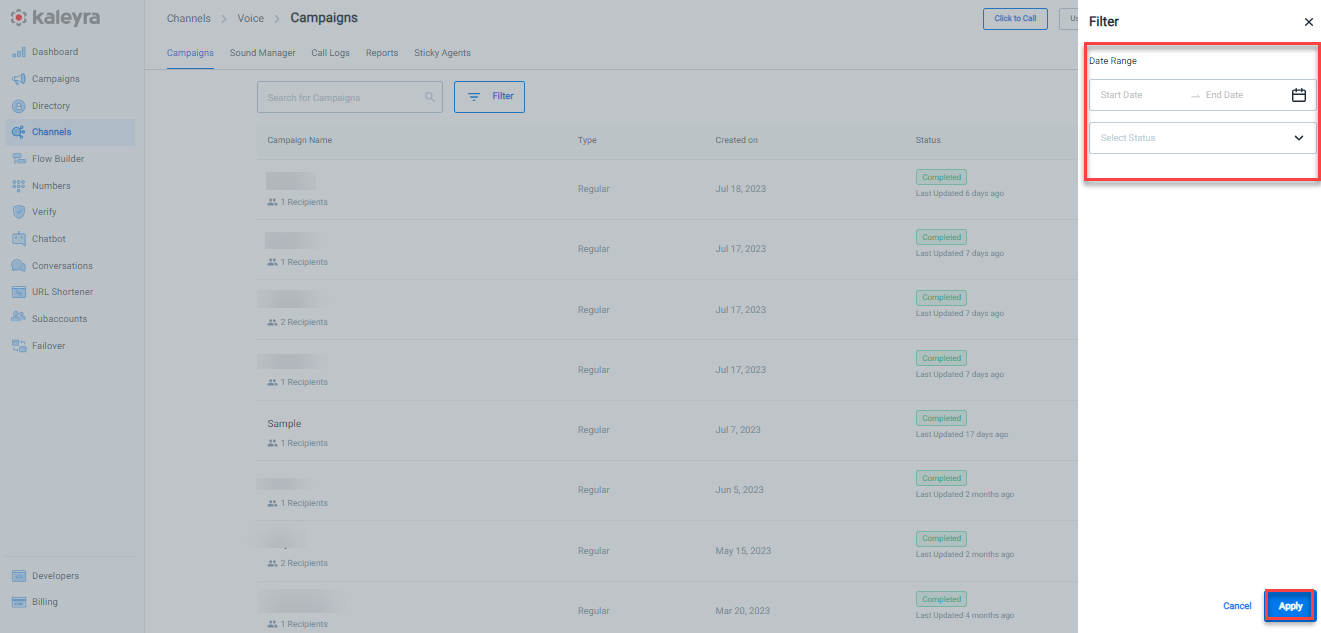
- You can filter campaigns based on the created date and status.
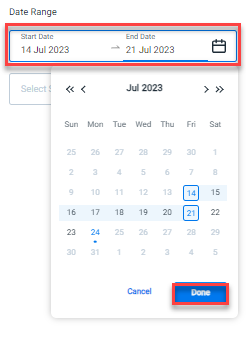
- Select the Start Date and the End Date from the Calendar icon and click Done.
- Click the arrow next to Select Status to view the list.
The following are the supported status options:
- Draft - Indicates that the Voice calls associated with the Campaign have not been submitted or scheduled yet.
- Completed - Indicates that the Voice calls associated with the Campaign have been completed.
- Scheduled - Indicates that the Voice Campaign has been scheduled for a later date or time.
- Failed - Indicates that the Voice Campaign failed to be submitted to the channel.
- Deleted - Indicates that the Voice calls associated with the Campaign was deleted.
- In Progress - Indicates that the Voice calls associated with the Campaign are currently being made.
Note:Only one option can be selected from the Select Status field.
- Click Apply. The Campaigns list as per the selected filters appears.
- Click Clear all filters to delete all the applied filters.
- On the Campaigns page, click Launch Campaign. The Launch Campaigns page appears.
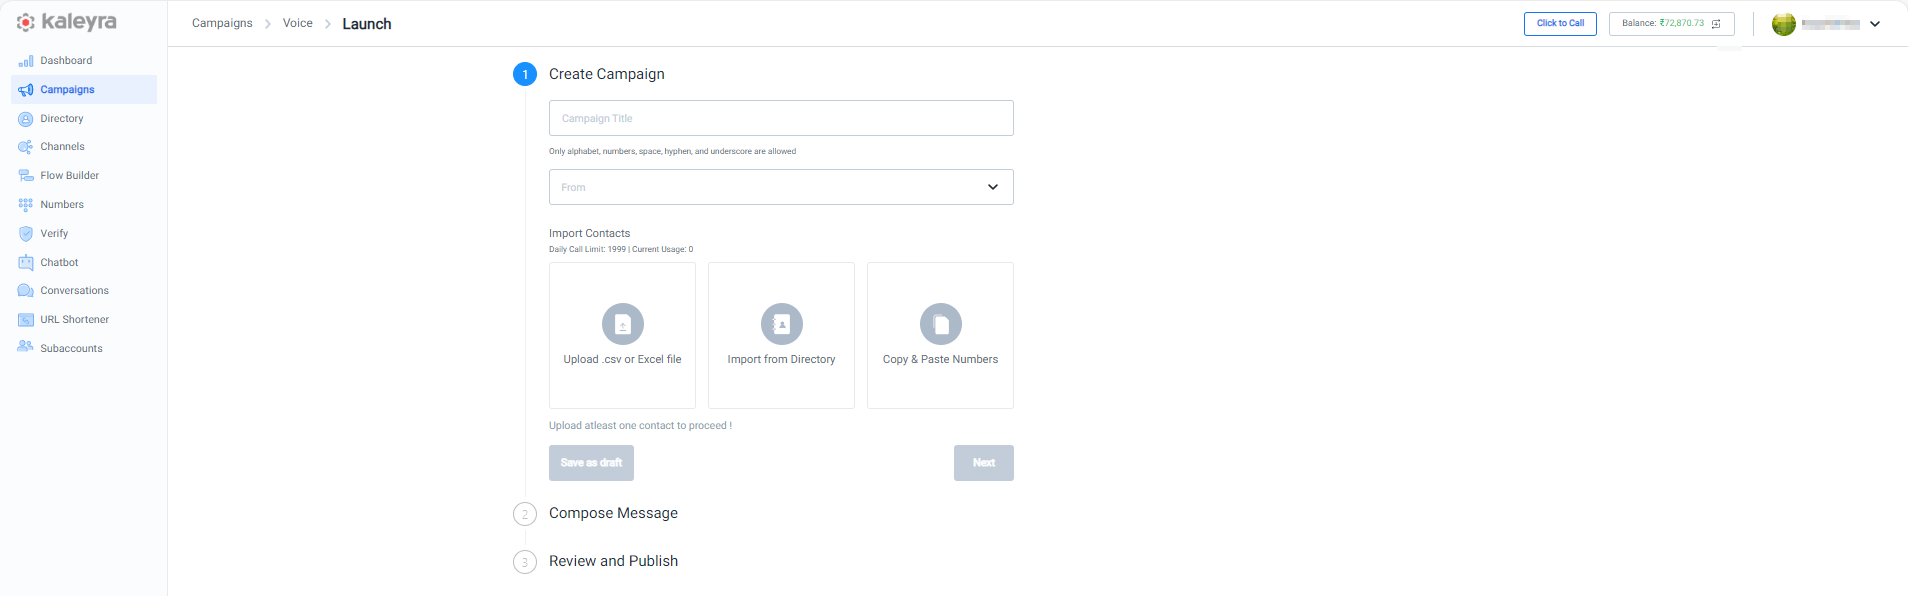
The Launch page has the following three sections to capture all the necessary details before you launch a campaign.
Create Campaign
The Create Campaign wizard helps you to create a voice campaign defining all the needed details.
The Create Campaign section has the following fields:
Campaign Title - Enter the campaign title.
Note:The title must contain at least 3 characters long and can only contain letters, numbers, spaces, hyphens, and underscores.
From - Click on the From field. You have the option to select one or more numbers prior to launching the campaign.
Note:When multiple From numbers are used in a campaign, it allows for parallel outbound calls, as the load is distributed across these numbers. This results in a shorter campaign execution time, benefiting the customer by speeding up the process.
Search - In the Search field, enter the complete or partial number for which you wish to search, and the respective number appears.
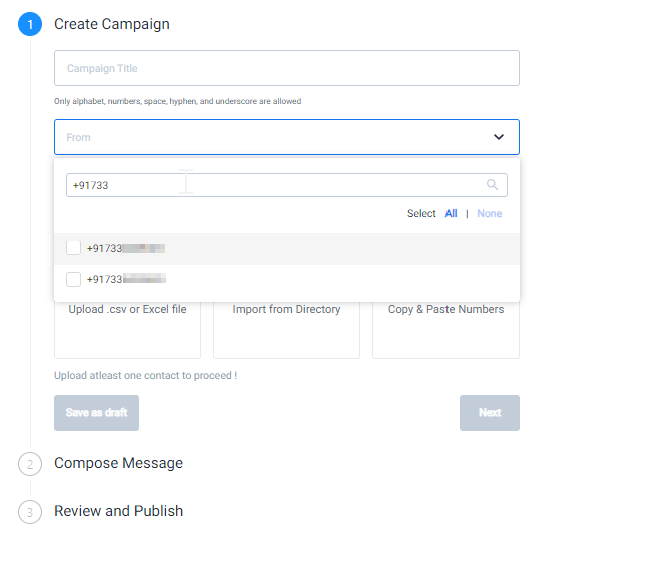
Select All - Click Select All to select all the numbers for the campaign.
None - Click None to deselect the selected numbers.
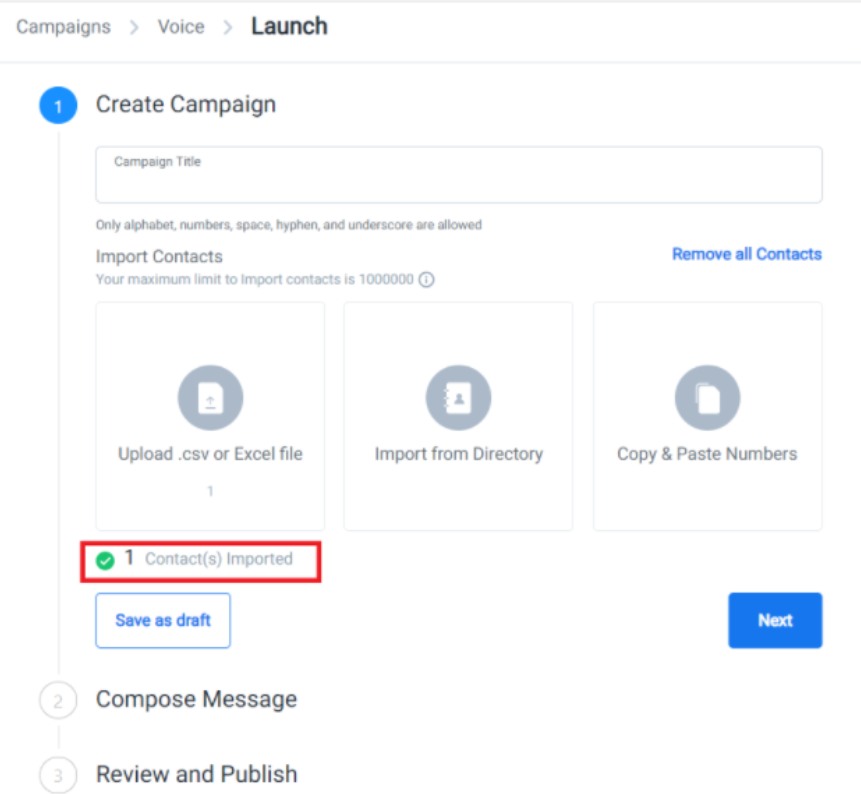
Import Contacts
The Import Contacts section has the following options:
Upload Contacts using the .csv or Excel file option
To use the .csv or Excel file option perform the following steps:
- Click Upload .csv or Excel file. The Upload .csv or Excel file page appears.
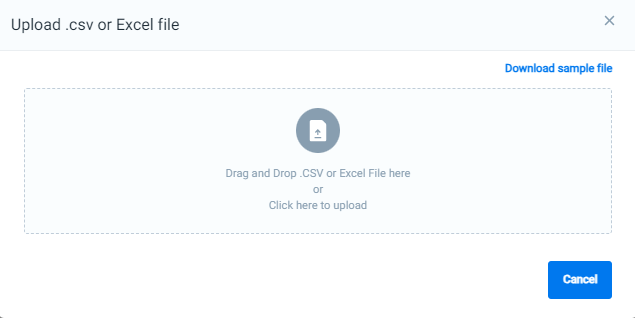
- You can drag and drop .CSV or Excel File or click to upload a file.
- Click Download sample file to download the sample .csv file. You can use this file as a reference to upload your contacts. A message "File Uploaded Successfully" appears.
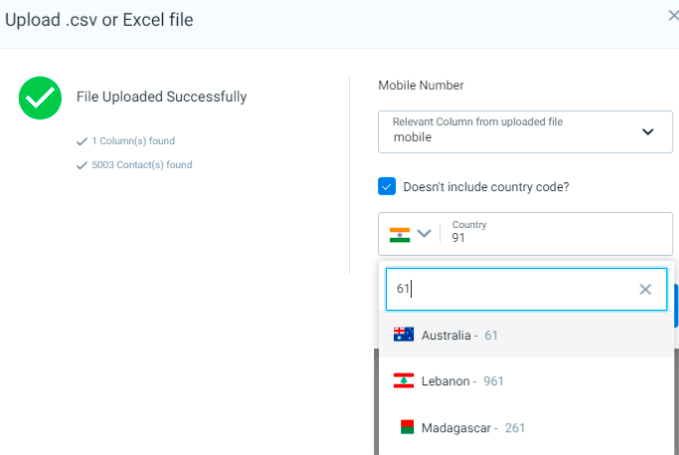
All the columns in the uploaded file will be listed in the Relevant Column from the uploaded file list.
- In the Relevant Column from uploaded file list, select the column name where mobile numbers are listed in your file. If the uploaded file does not contain country codes prefixed, select the Doesn’t Include Country Code checkbox and select the applicable Country Code from the drop-down.
Notes:
- If the uploaded file does not contain Country Code prefixed mobile numbers, then select the Doesn’t Include Country Code? checkbox and search for the appropriate Country Name or Country Code from the list.
- In the search bar, you are not required to prefix the Country Code with a + symbol.
- Additional columns can be added to pass relevant information. These column headers can be used as variables while composing the message for personalization.
- The maximum limit to Import contacts is 100,000.
- You need to upload at least one contact to proceed.
- Click Import. You can view the contacts that have been imported.
- Click Remove all Contacts to clear anything that has been uploaded or added.
- Click Cancel to cancel and return to the Campaigns listing page.
Import Contacts using the Directory option
To use the Directory option, perform the following steps:
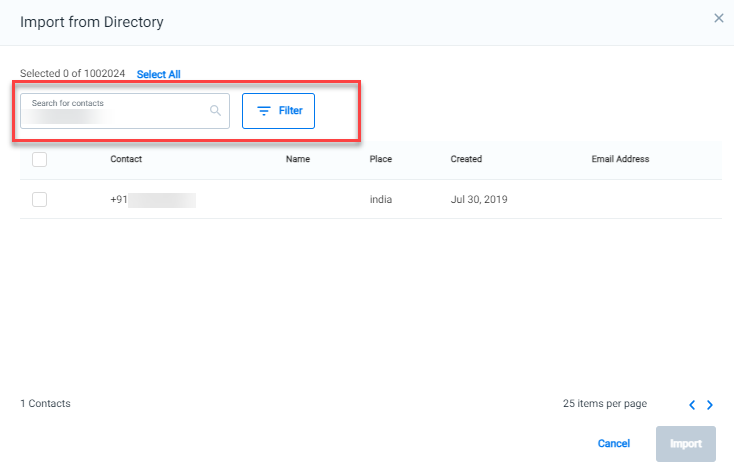
- Click Import from Directory. The Import from Directory page appears.
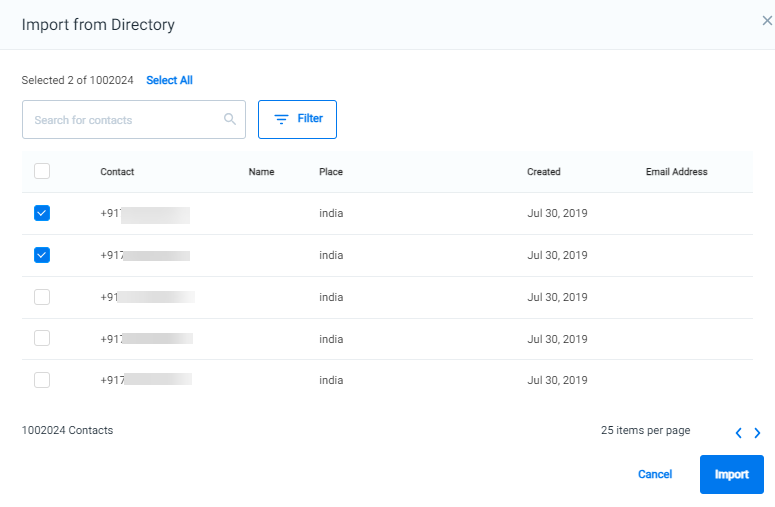
- Select the required contacts and click Import. For more information regarding Directory, refer to Overview page.
- Click Select All to select all the contacts in the list.
- Click Unselect All to remove the contacts from the list.
Note:Contact information other than numbers is not imported from directories. Personalization using dynamic variables is therefore not possible.
View the Search and Filter option
To view the Search and Filter options, perform the following steps:
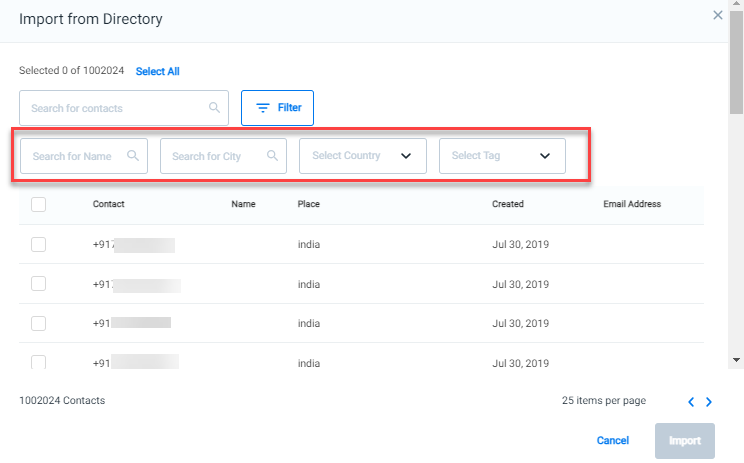
- Click Import from Directory. The Import from Directory page appears.

- In the Search for Contacts field, enter the number or partial mobile number for which you wish to search and click Filter. The available filter options appear.
- Contacts added in the Directory can be imported to the campaign by filtering based on Name, City, Country, or Tag.
Import Contacts using the Copy & Paste Numbers option
To use the Copy & Paste Numbers option, perform the following steps:
- Click Copy & Paste Numbers. The Copy and Paste Contacts page appears.
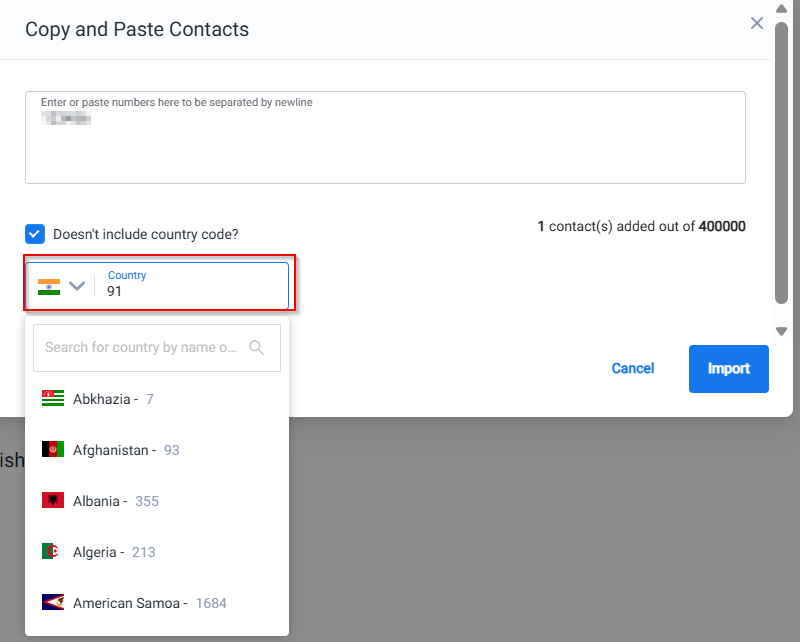
- Contact numbers can be directly added to the campaign by manually entering them or copying and pasting the list of phone numbers separated by a newline.
Notes:
- This method is not recommended for large campaigns (if you have more than 100 contacts, use a CSV or Excel file to import your contacts).
- If you have not entered the Country Code, select the Doesn’t Include Country Code? checkbox and search for the appropriate Country Name or Country Code from the list.
- In the search bar, you are not required to prefix the Country Code with a + symbol.
- The maximum number of contacts supported in the Copy and Paste Contacts input field is 400000.
- Click Import. You can view the contacts imported under the Create Campaign section.

- Click Next, after adding contact numbers to send the Voice message. The Compose Message section is enabled.
Daily Call Limit
The Daily Call Limit functionality is used to configure the daily limit for number of calls that can be processed in a day. By using this, the administrator could make sure that you are running the campaigns according to plan and staying within allotted restrictions.
- When you are attempting to upload contacts that exceed the set daily call limit, then the following warning message is displayed: “Oops! Your number of contacts should not exceed your daily call limit. Please check again and for more details please reach out to the support team” and the Launch button is disabled.
- Previously in the day API calls or other Campaigns have already been triggered, then the call usage count due to such API calls and Campaigns is considered for the daily limit validation. For example, if the configured daily limit is 1000 calls and the usage count is 600 created calls, then the daily count for available calls in the day is set to 400 calls.
- The campaign status is displayed as failed, If the first batch of the scheduled campaign exceeds the daily call limit. In this case, no batches will be submitted.
- Before processing each new batch of a given campaign, it is checked whether the number of contacts in the batch is still within the available daily call limit or not. If yes, then the batch is processed as usual, if not, the batch and any other subsequent batch is not processed and marked as failed. In this case (some batches are processed, and some are failed) the campaign status is marked as completed.
Note:If you want to enable the Daily Call Limit Functionality, you can contact our Support team.
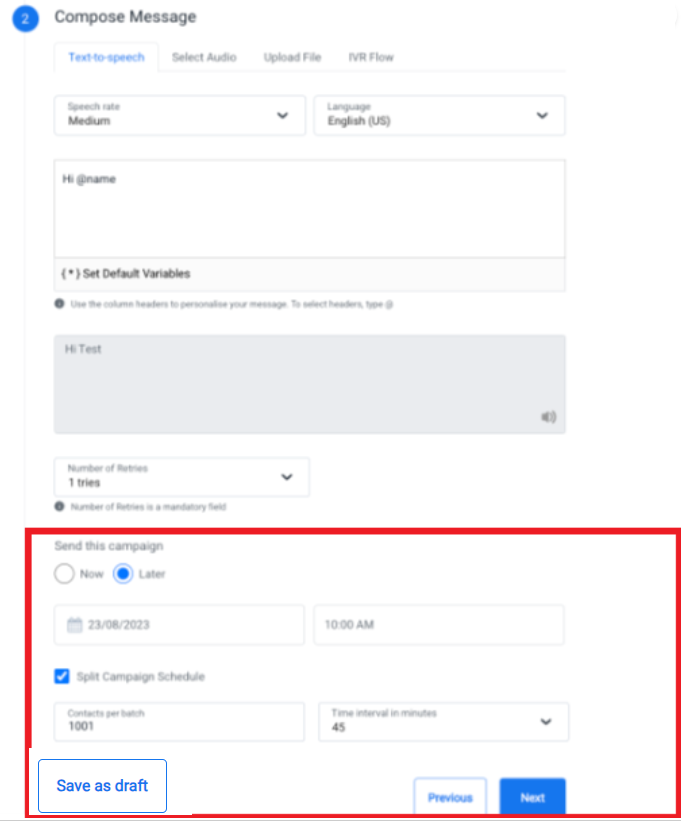
Compose Message
The Compose Message section of the Voice Launch page helps you to create the Voice message body.
There are four ways in which a voice message can be added to the campaign:
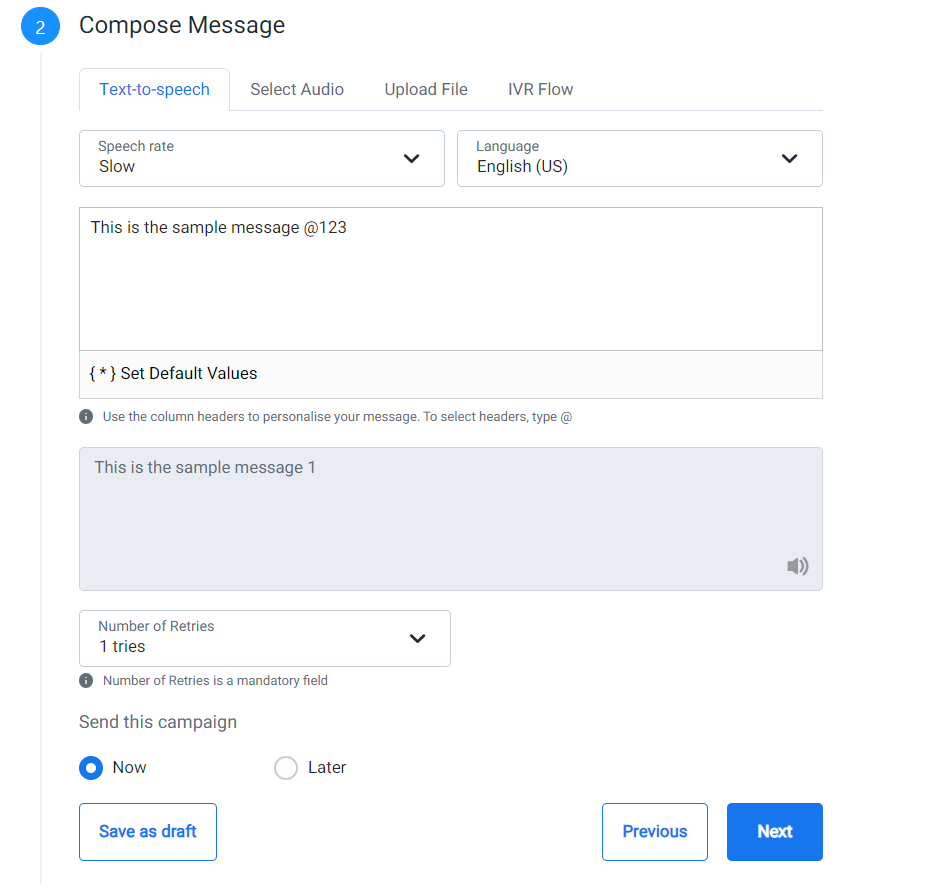
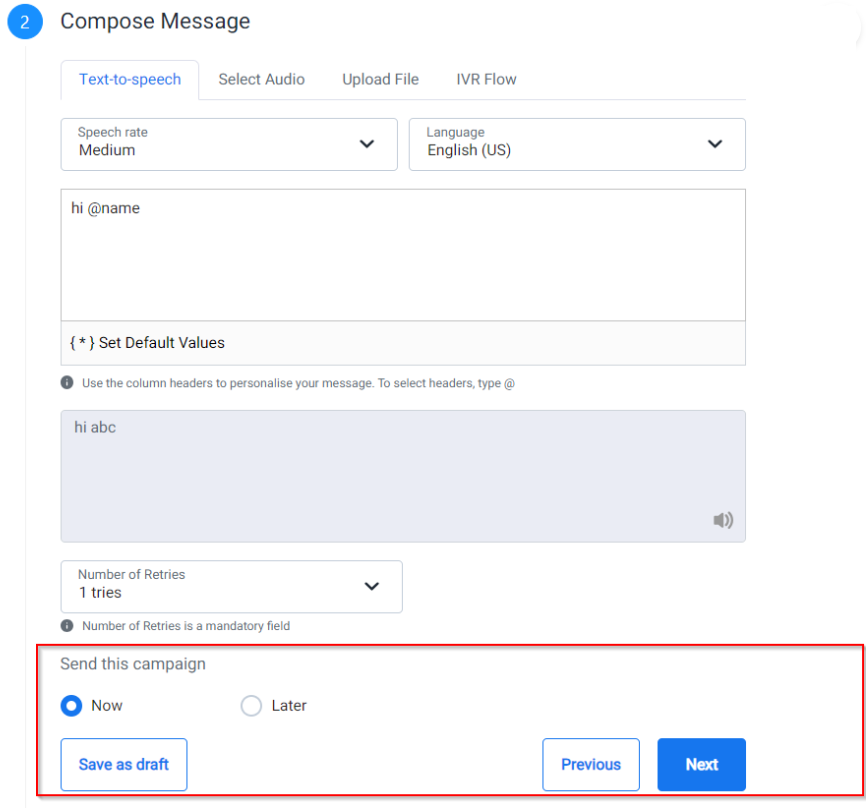
Text-to-speech
The text that is entered in the textbox will be converted to speech using Text-to-speech functionalities.
The Text-to-speech section has the following fields:
- Speech rate - Select the speech rate from the list at which the message should be played.
- Language - Select the preferred language from the list. The languages supported are English (US), English (IN), Italian, Spanish, Hindi, Kannada, Telugu, Tamil, Malayalam, Gujarati, Punjabi, and Bengali.
Notes:
- Indian regional languages are available by default in the IN region. However, they can be used by customers belonging to other regions by reaching out to our support team.
- The numerical entered will be translated to the selected language automatically.
- Message - Enter the text that should get played as speech. Click on the required header to use them as a variable in the message.
Note:You can add dynamic variables using @, { }, and {{ }} symbols to get the values of column headers or variables from the uploaded. CSV or Excel sheet.
- {*} Set Default Values
a. Click {*} or Set Default Values. The Set Default Valuessection appears.
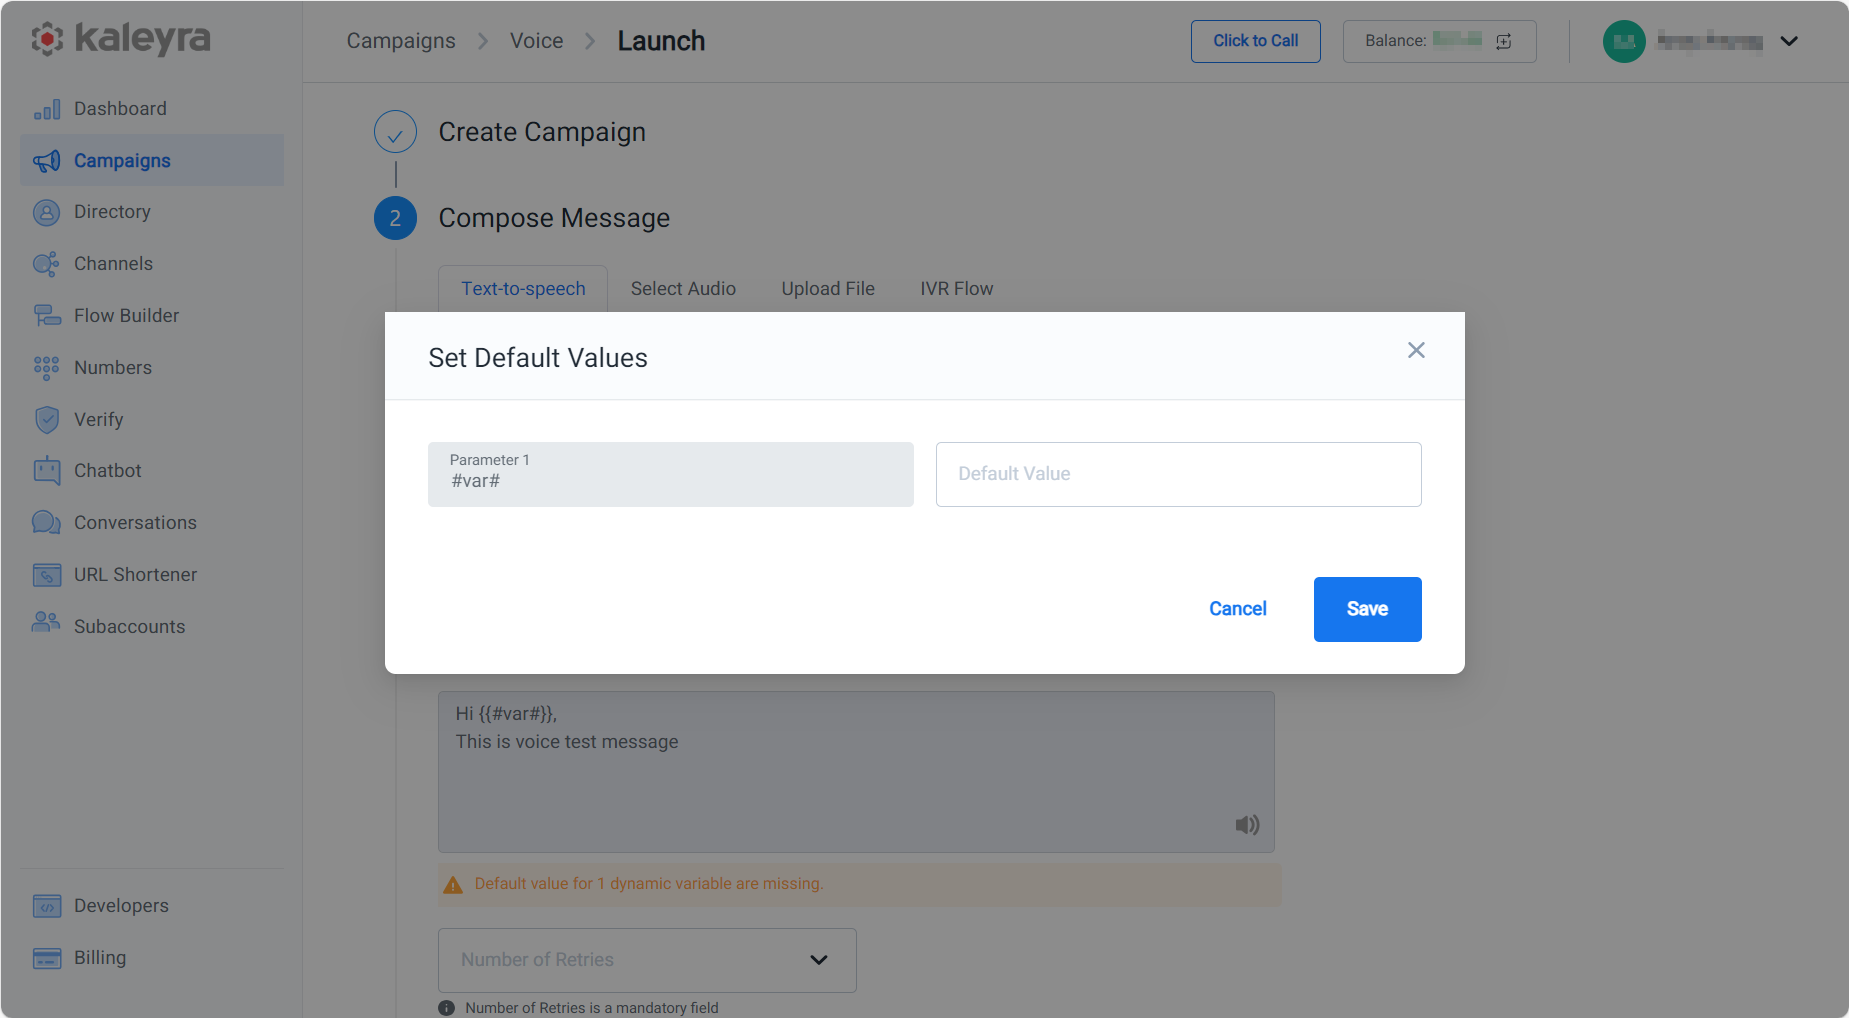
b. In the Default Value field, enter the required default values to the listed parameters. Default values can be set for each variable configured in the message. These values will be replaced when there is no data available for a given recipient for the respective variable in the uploaded campaign file.
c. You can enter the desired values (the values entered here will be used if there are no values associated with the record in the .csv or Excel file).
d. Click Save.
- Preview - You can view the preview message that has been added under the Message section. Click the audio icon to hear the message.
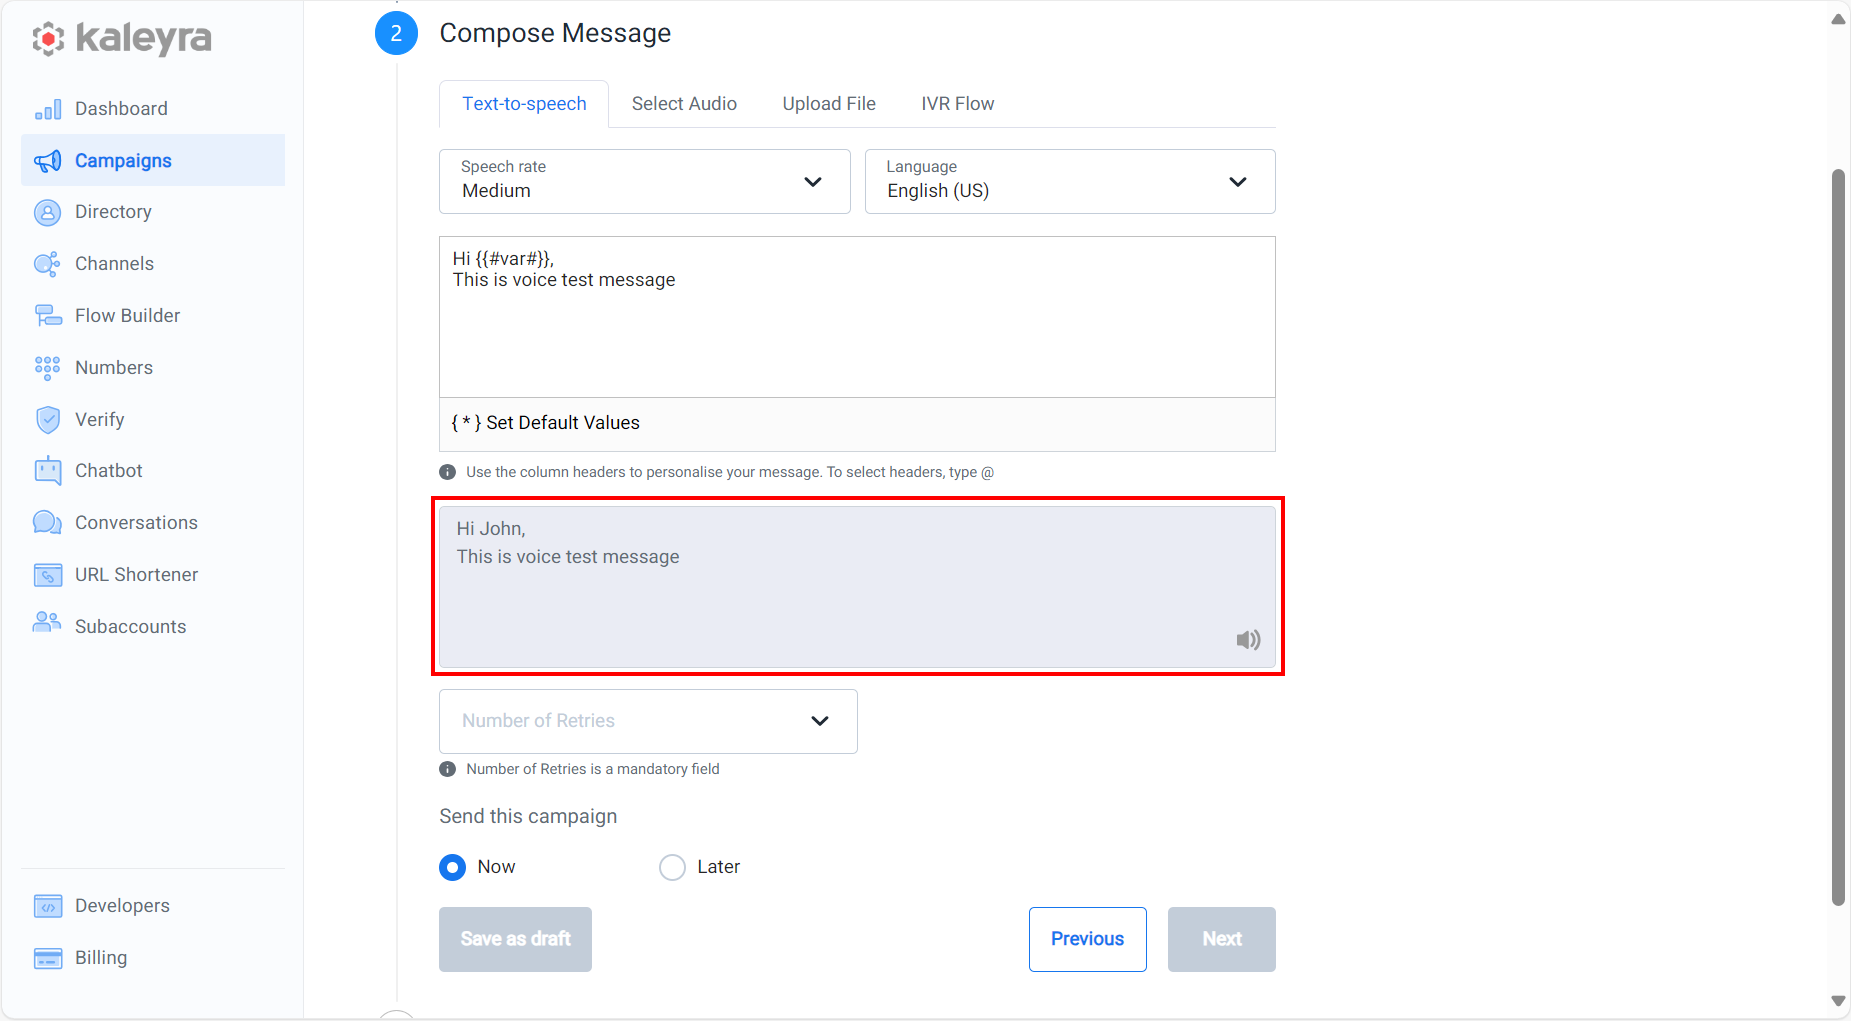
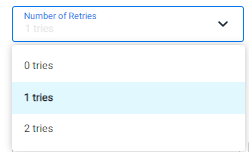
- Number of Retries - This is a mandatory field and represents the number of retries for each single call done inside the campaign to any given number. The retry is applicable for Failure scenarios.
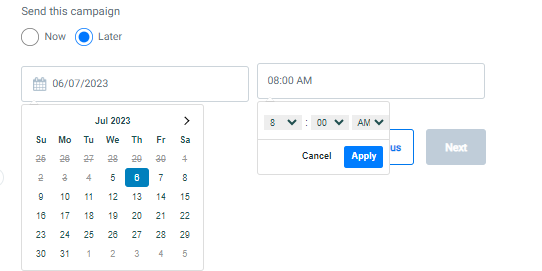
- Send this campaign - You have the option to send the campaign now or at a later time.
- Now
- Select Now to send the campaign immediately.
- Later
- Select Later to schedule the campaign at a later time by selecting the Day and Month from the Calendar icon (for 90 days).
- Select the time from the list and click Apply.
- Now
Select Audio
The previously uploaded audio files are displayed when the Select Audio option is chosen. Click on the preferred file to be used for the campaign and proceed further.
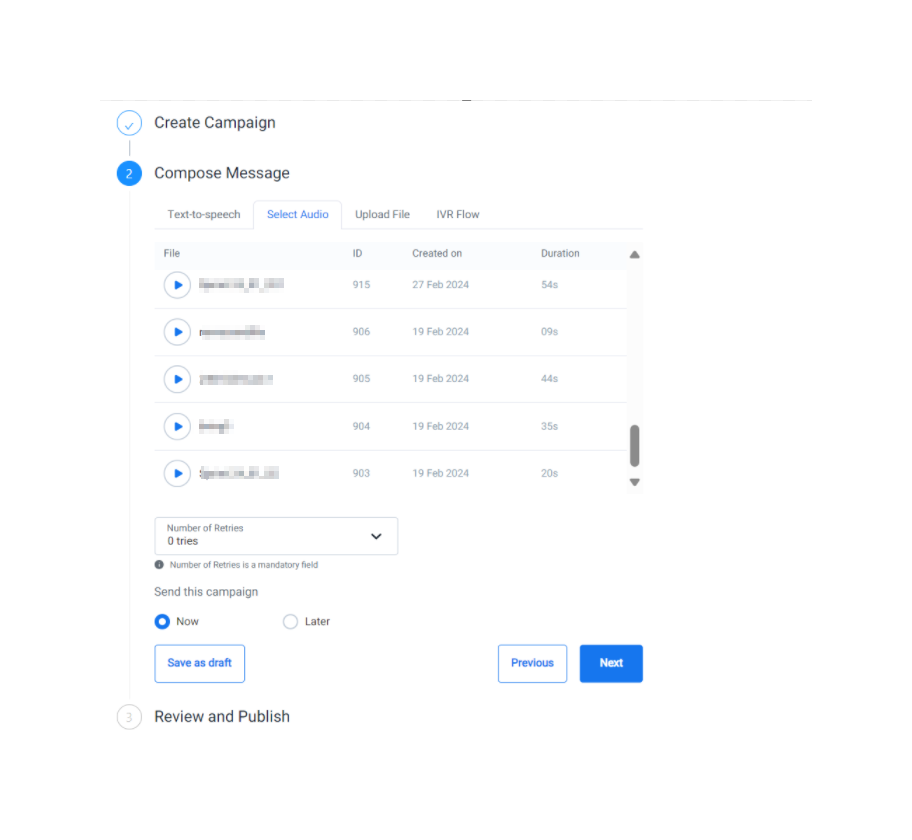
Notes:
- The maximum file size is 10 MB, and the supported formats are mp3 and .wav.
- Audio files can be uploaded under the Voice channel in the Sound Manager section.
- Number of Retries - For more information related to the Number of Retries field, see the Text-to-Speech section.
- Send this campaign - For more information related to Send this campaign field, see the Text-to-Speech section.
Upload File
The Audio files can be directly uploaded to the campaign. Upload a new sound file from the system you wish to use in the campaign. The uploaded sound file will be saved under Sound Manager for easy access.

The Upload File has the following fields:
- Title - Enter the title in the text box. You can drag and drop the mp3 or WAV file or click to upload a file.
Note:
- Only alphabet, numbers, space, hyphen, and underscore are allowed for the Title.
- The maximum file size is 10 MB, and the supported formats are mp3 and .wav.
- Number of Retries - For more information related to the Number of Retries field, see the Text-to-Speech section.
- Send this campaign - For more information related to Send this campaign field, see the Text-to-Speech section.
IVR Flow
A flow published in the Flow Builder can be linked to the campaign using IVR Flow. This linking enables you to leverage the capabilities of Flow Builder within Voice campaigns. The flow is executed when the call is answered by the end customer.
All the column headers part of the uploaded sheet can be used as variables within the Flow. The format is {{payload. variable}} and is supported by the following widgets: Play, IVR Menu, Keypress, Repeat, SMS, Email, and Choice.
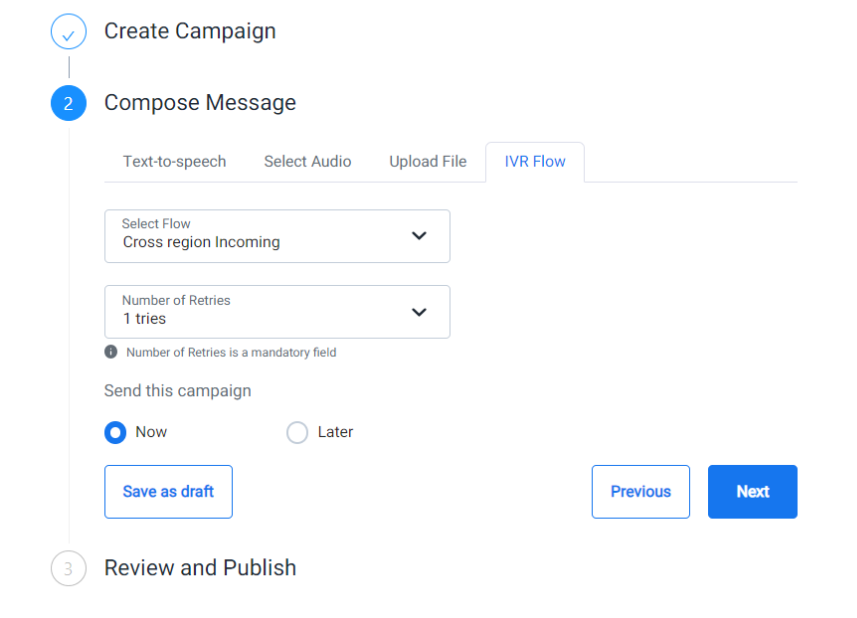
The IVR Flow has the following fields:
- Select Flow - Click the arrow next to the Select Flow field to view the list. All the published flows are displayed in the list and they are searchable.
- Number of Retries - For more information related to the Number of Retries field, see the Text-to-Speech section.
- Send this campaign - For more information related to Send this campaign field, see the Text-to-Speech section.
Click Next. You can view the Review and Publish section.
Note:The documentation for the Flow Builder is available here.
Review and Publish
You can view the summary of the campaign.
The Review and Publish section has the following fields:
- Campaign Summary - The summary of the campaign (Total Contacts, Total Units, Scheduled on, and Estimated Cost) is displayed here for review.
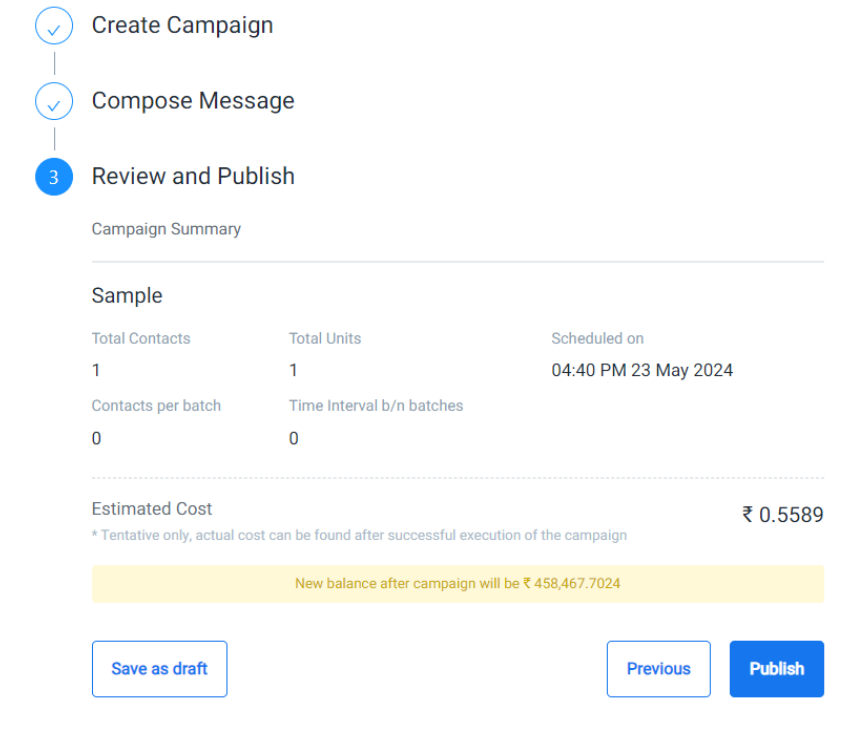
- Estimated cost - The estimated cost is calculated based on the tentative duration of each call and the pricing set for the account. If you are a prepaid customer, the equivalent amount of money will be deducted when the campaign is published and if it is not completely used up, the unused amount will be refunded after the campaign ends.
Note:
- Campaigns cannot be deleted once published.
- The credits will be adjusted based on the actual cost after campaign completion.
Click Publish. You can track the status of your published campaigns on the Campaigns listing page.
Schedule a Voice Campaign
You can choose to launch a campaign as soon as you create it (now) or send it later. While scheduling the campaign launch, you can also choose to split the campaign into different batches of 1000 contacts (minimum) and launch them at a time interval of 15 minutes and up to 75 minutes.
To launch the Voice Campaign Immediately, perform the following steps:
- On the Compose Message section, select the Now option in the Send this campaign field.
- Click Next. The Voice campaign is launched.
To schedule a Voice campaign for a later date and time, perform the following steps:
- On the Compose Message section, select the Later option in the Send this campaign field.
- Select the date and time from the Calendar at which the campaign should be scheduled. By default, the current date is displayed.
- Select the Split Campaign Schedule check box if you want the campaign to be split into batches. (available only when there are 1000 (or more) contacts.
- Enter the number of contacts to select in each batch. For using the split option, you must have 1000 (or more) contacts.
- Select the time interval between the batches to be published. Available time intervals are 15, 30, 45, 60, and 75 minutes.
Click Next. The Review and Publish page appears. For more information see, the Review and Publish section.
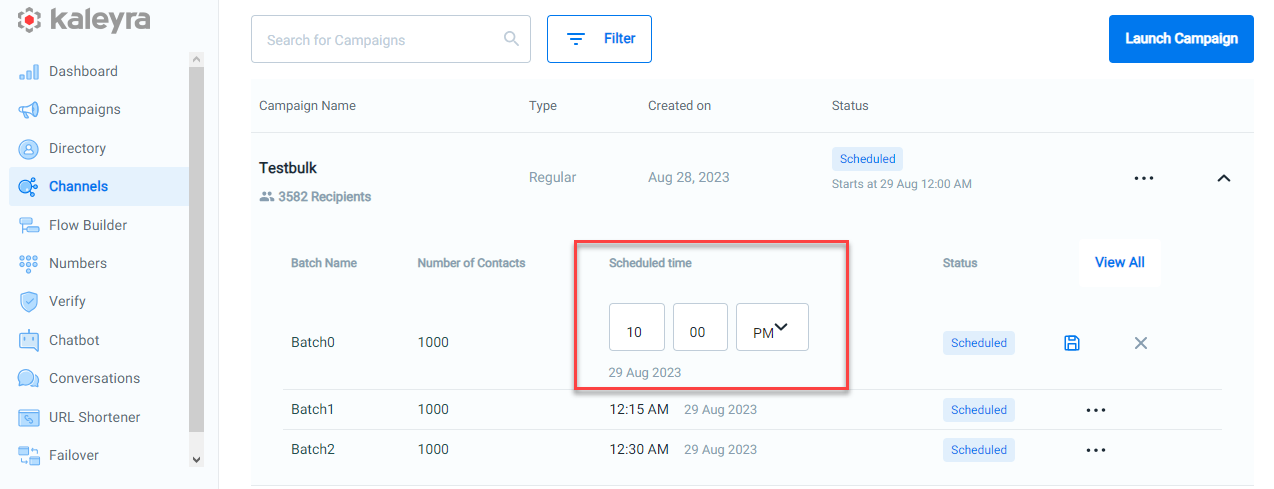
Edit scheduled batches of Voice campaign
You can use the Edit option to change the batch time to be published (the new time should be more than 15 minutes from the current time).
To edit a schedule batch of Voice campaigns, perform the following steps:
- On the Campaign Listing page, click the down arrow button to view the list of scheduled batches.
- Click on the three dots next to the Scheduled status column.

- Click Edit. You can change the Scheduled time based on your preference.
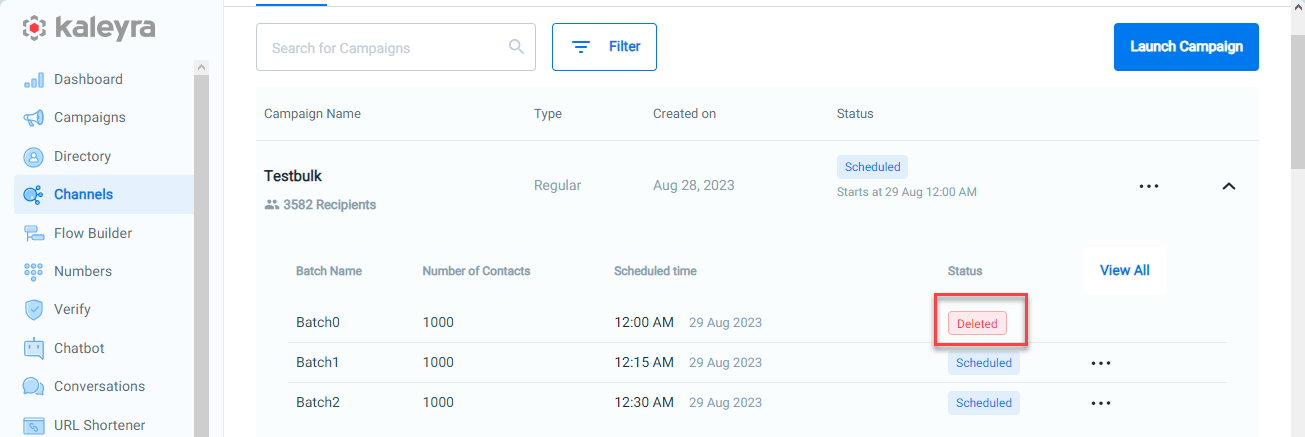
Delete scheduled batches of Voice campaign
To delete a scheduled batch of voice campaigns, perform the following steps:
- Click on the three dots next to the Scheduled status column.
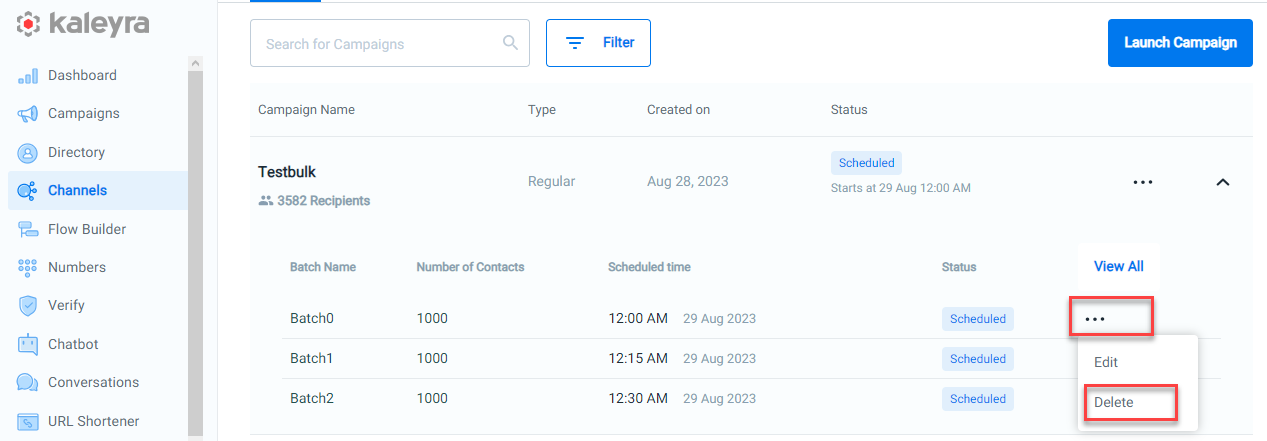
- Click Delete. A confirmation pop-up appears.
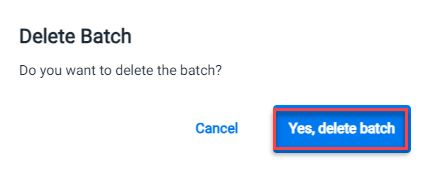
- Click Yes, delete batch. The selected batch will be deleted with the status Deleted.
Note:You cannot delete or reschedule campaigns when they are in process.
Updated 3 months ago